Monthly Archives: April 2012

28: boiler jacket

The boiler jacket is a thin shell (No. 20 sheet metal) that wraps around the boiler. There is a space between the boiler and the jacket for insulation.

Originally, the CK Holliday had a dark gray boiler jacket, so I tried to duplicate it here:

The brass bands are usually secured at the bottom by a screw or a bolt to tighten the band against the jacket. Except for where the bands terminate at the firebox. I’m not sure how they are secured in that case.

The engine underwent a lot of changes since 1955. One of them being the boiler jacket getting cut short. Instead of wrapping the boiler entirely, the jacket terminates somewhere under the running board. Here’s the jacket as seen at the Fullerton RR Day:

Another change is the running board. Originally the CK Holliday had tapered, split type. Today, for ease of fabrication, the board has been changed to a straight type. Compare between 1955 and today:

Of course, the model will have the original running board:

Leave a Comment

Filed under CK Holliday build

27: ashcroft gauges

In getting ready for plumbing the engine, I’ve made the two Ashcroft gauges that are on the engine.

The main gauge is 6″ Ashcroft Type 1009, used to read boiler pressure. Attached to this is a smaller duplex gauge for the air brake, and it’s an Ashcroft Type 1038.

Both gauges were made to Ashcroft’s own dimensions and specs.

The boiler gauge is mounted in a custom W-shaped brass bracket looking typical of an 1880 engine.

Leave a Comment

Filed under CK Holliday build

26: halfway milestone

The engine is now just about halfway done! This is now a good opportunity to look (in colors!) at the engine as it stands:

That’s what the real CK Holliday looked like at one time in 1955!

Not everything can be seen in the above pictures because many components and features are hidden inside the model. For example, below pictures are cutaway from the boiler showing the flues and steam pipes, and cutaway from the right cylinder showing the appropriate steam and exhaust cavities, and the valve slide (unfortunately I didn’t render them).

Leave a Comment

Filed under CK Holliday build

25: smokebox

Since the last update I took the time to almost completely “rebuild” the existing model. More on that later.

Now the smokebox is added to the model with the T-pipe and distinctly curvy steam pipes inside. The exhaust nozzles are also added. And of course, the very distinguished balloon stack that is prominent of the CK Holliday.

The stack is made of No 10 gauge sheet metal in 6 segments. Is it a welded construction but it features faux rivets at the seams. And although it is diamond shaped, the actual exhaust stack is straight. The diamond/balloon outer shell is supposed to allow for attachment of sparks arrestor. But the CK Holliday (and all of DLR engines) being an oil (diesel) burner, it doesn’t actually have this device.

Leave a Comment

Filed under CK Holliday build

turning radius

I needed to figure out if my design will make all the turns on the DLR line.

A discussion on Burnsland figured out that the sharpest curve on the DLR main line is 278′. But the absolute sharpest turn is actually at the roundhouse switching track. Here’s the #1 on this track entering the main line on one morning.

I don’t know what that particular radius is, but just for fun I assumed that it’s half of the smallest turn on the mainline, or 139′.

Figuring out the turning radius for a vehicle is actually not a completely straightforward task. A lot of different geometries can define the final turning radius. Since I’m just doing a verification of my own design, I just made up a fairly simple one.

Since there are 4 wheels on each rail, when going around a curve, each wheel can be approximated as a point on a curve. Connecting these points describes an arc, which we can then get its radius.

There is “play” with these points also because the wheels have thickness to them. (Technically, the driver wheels cannot deflect because they are rigid in the frames). In the above picture, I deflected the pilot truck until the rear wheel is near but not in contact with the inner crosshead guide. Then I draw an arc connecting the 4 wheels together.

This process gives an arc of about 1350″, or 112′, which is less than my assumed smallest curve of 139′, and certainly much less than 278′ on the mainline.

So indeed, there’s plenty of room for the pilot truck to turn. Generally, rail curves are made to be as large as possible, so in reality the pilot truck does not swing that much.

Leave a Comment

Filed under CK Holliday build

boiler and frame rendering

With the boiler mated to the frame, let’s look at the whole assembly together:

(Click on the picture to see the full size).

Imagine, that’s what the CK Holliday once looked like in 1954 in a warehouse under construction.

Leave a Comment

Filed under CK Holliday build

24: boiler and firebox

Making the boiler is a bit like a mini-project in itself. It consists of several major parts including:

  • The firebox
  • The stay bolts
  • The tubes and sheet; and
  • The steam dome

Here, I’ve made the first two. The firebox is fitted in the boiler with adequate (3″) water space on all sides. The firebox is also fixed to the boiler by almost 350 stay bolts.

The stay bolts are 7/8″ diameter and vary in length depending on the location. The bolts are supposed to be threaded at both ends as the method of fastening but that detail is not shown nor necessary for this purpose. One other neat feature is that the outer end of the bolts have a 3/16″ diameter hole drilled 1.25″ deep. This is supposed to leak water to alert the crew if the bolt has fractured.

Here’s a picture of the real stay bolt ends.

Now, getting information on the Disney boiler may seem nearly impossible. Fortunately, they have a spare! Better yet, they’ve cut it open.

After the major Ripley’s refurb which includes it getting a new boiler, the roundhouse crew decided to keep the old boiler and dissected it. They keep it in the back of the roundhouse to teach new engineers the inner workings of steam boilers. Here’s a picture of it I took at one of the visits. I wonder if it’s still there.

By the way, the plywood sheathing you see behind the boiler is not a wall–that was the coach Lilly Belle!

Anyway, the boiler I made is basically the same. It’s missing the tubes and tube sheet, steam dome, fire brick lining, and a cutout for the atomizer, blowout, and louvers.

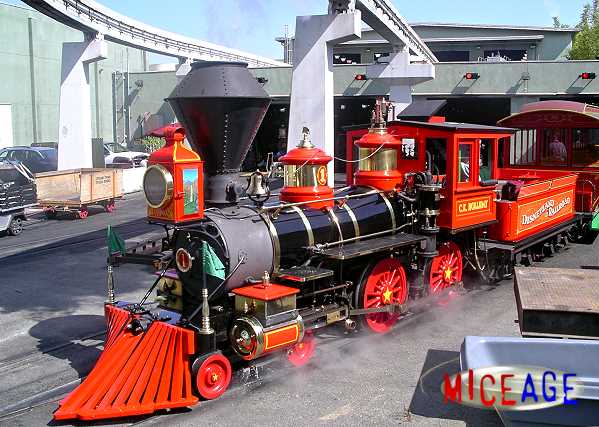
The CK Holliday was meant to be a model of a wood burner. At the park, she burns oil (diesel, actually), so the firebox will not get the firebox grating that would be for wood burning engines. But even as the bottom is closed for burning oil, I wonder if there is an opening at the bottom of the firebox for drafting or cleanout? If you look at the engine at night, the glow of the fire is readily seen underneath the firebox. So there is light leaking through… or is that from the atomizer louvers?

EDIT: Some more progress below:

The above shows addition of the tubes and tube sheet. There is also a flange at the steam dome opening. The steam dome will be welded to this flange.

The tube sheet still needs to be punched in for the dry pipe.

The tubes or flues are 2″ O.D. with 3/16″ wall thickness. There are 67 tubes giving total area of 138.95 sq. in.

1 Comment

Filed under CK Holliday build