sunset in the cab

It can get really atmospheric in here… I’ll just show you the pics and let you see for yourself!

2015-08-20 20_08_56-Greenshot

2015-08-20 20_07_32-Greenshot

3 Comments

Filed under Steam Engine Simulator

your new office… the engine cab!

It’s been a while since I posted a proper, really meaty update, but now I finally have something to show and there’s going to be a lot of it! I spent the last few months purely on the graphical aspect of the sim. It’s fun to see the physics work, but putting these graphics in is really making the sim (slowly) come to life! Let’s see if you’ll agree!

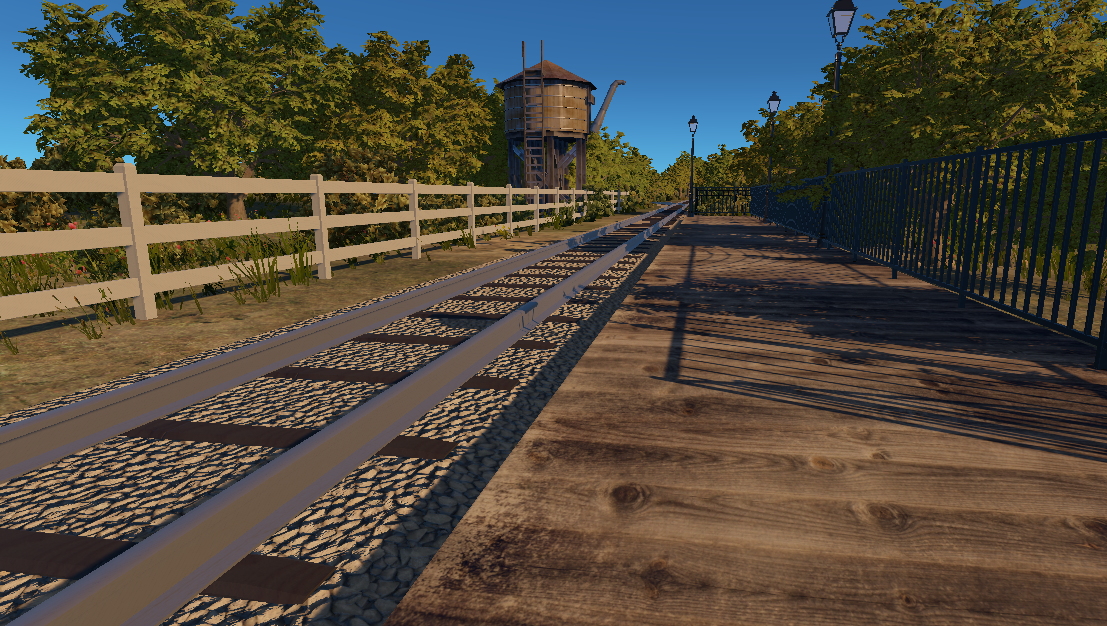
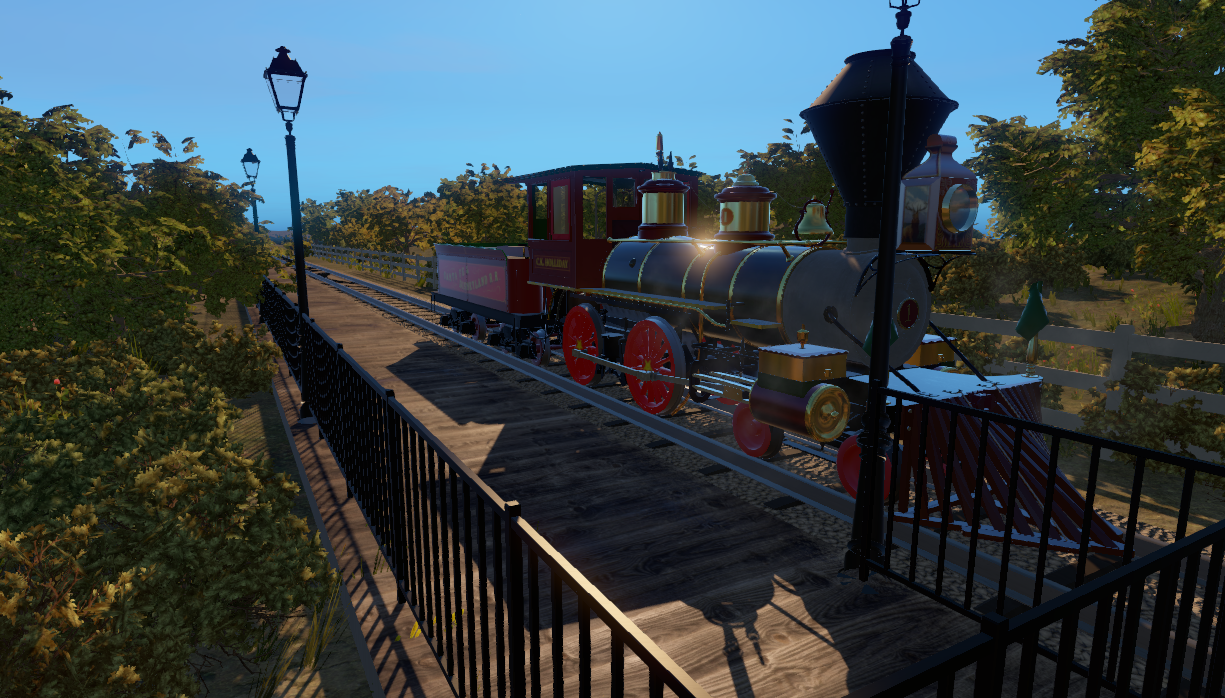
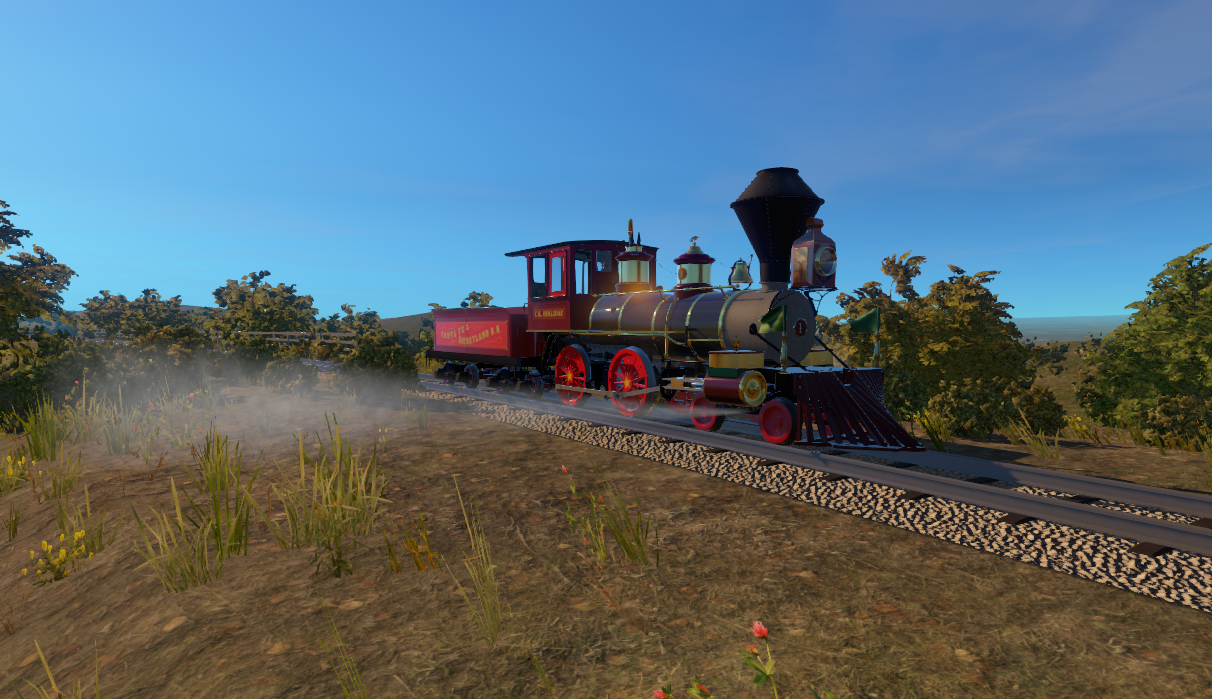
These pictures are directly from the sim. They are not renderings! This includes the outside scenery, which isn’t completely ready yet so it’ll be featured in a different update. But keep in mind that many of the features I want to show may be very subtle, so you’ll definitely have to click on the pictures to see the enlarged version. Also, when a picture gets resized smaller it will appear darker as it loses pixels, so I’ve only brought up the bright levels in these pictures to compensate, otherwise these are raw sim images!

2015-08-16 01_53_34-Greenshot

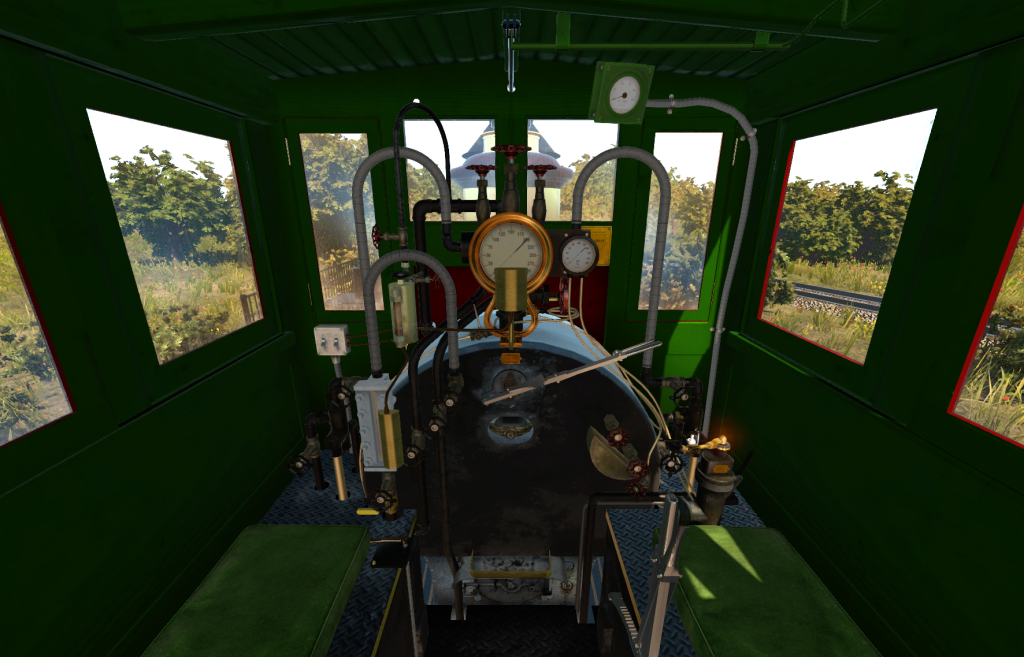
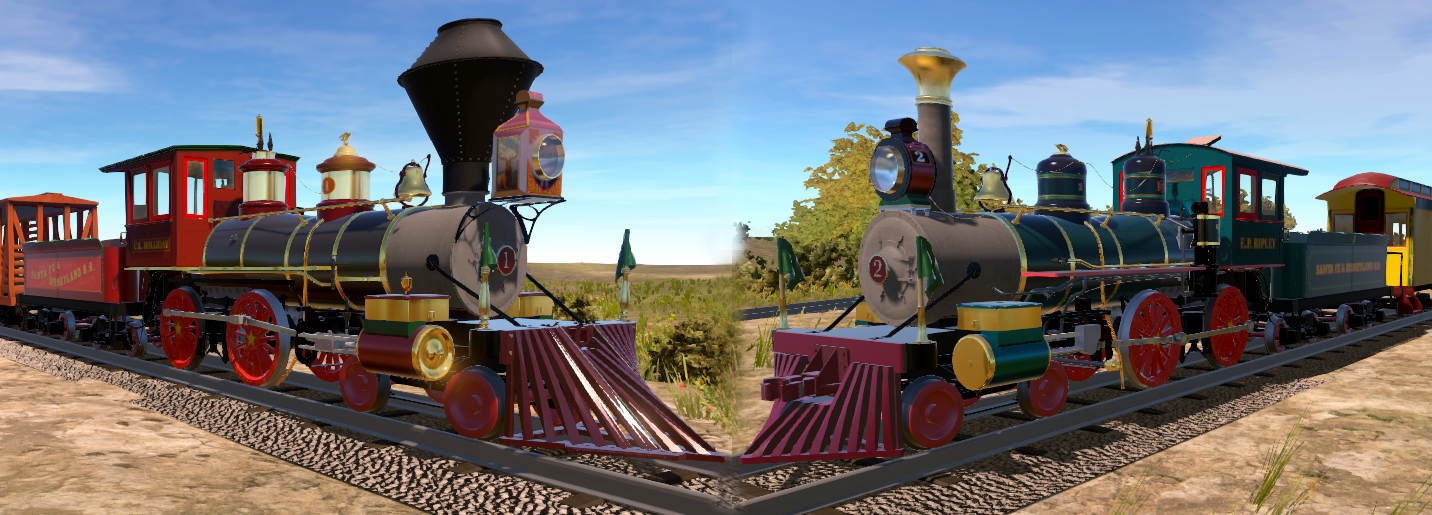
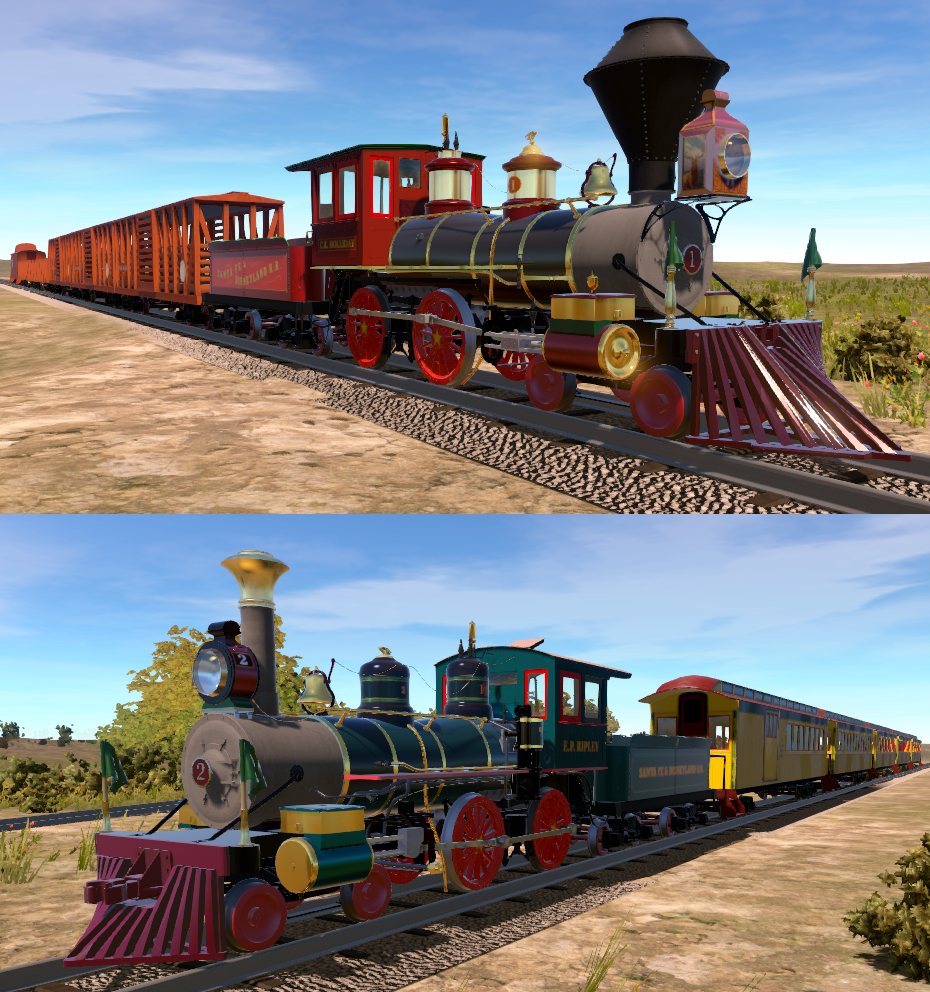
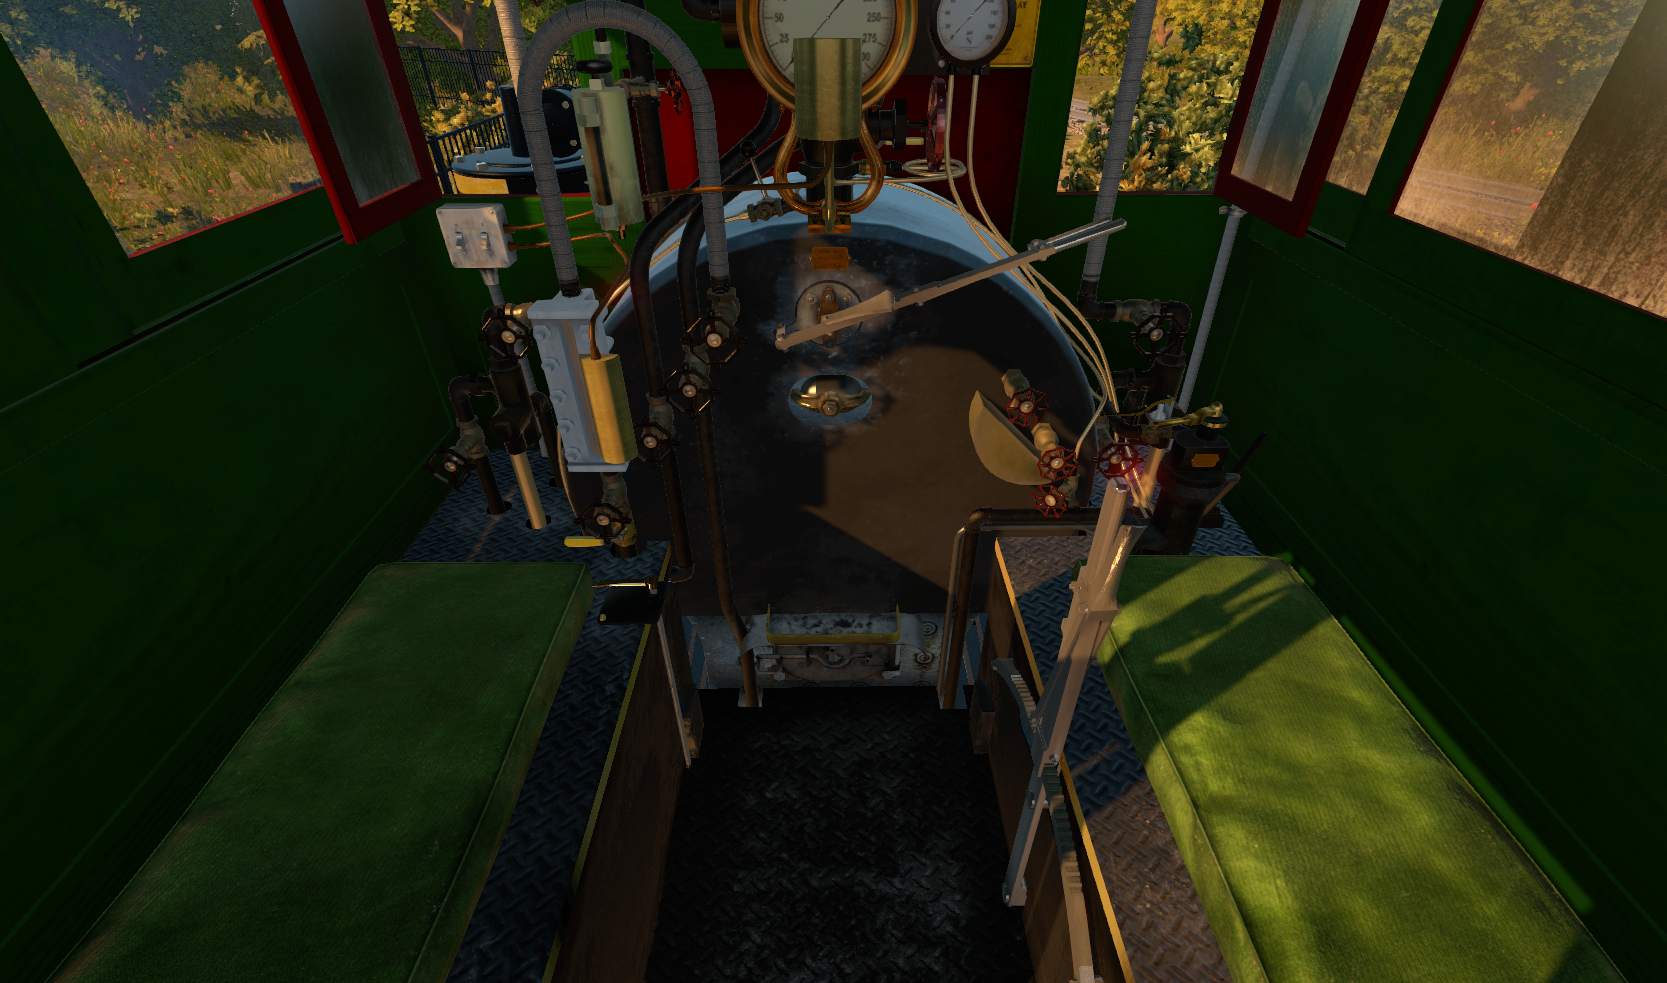
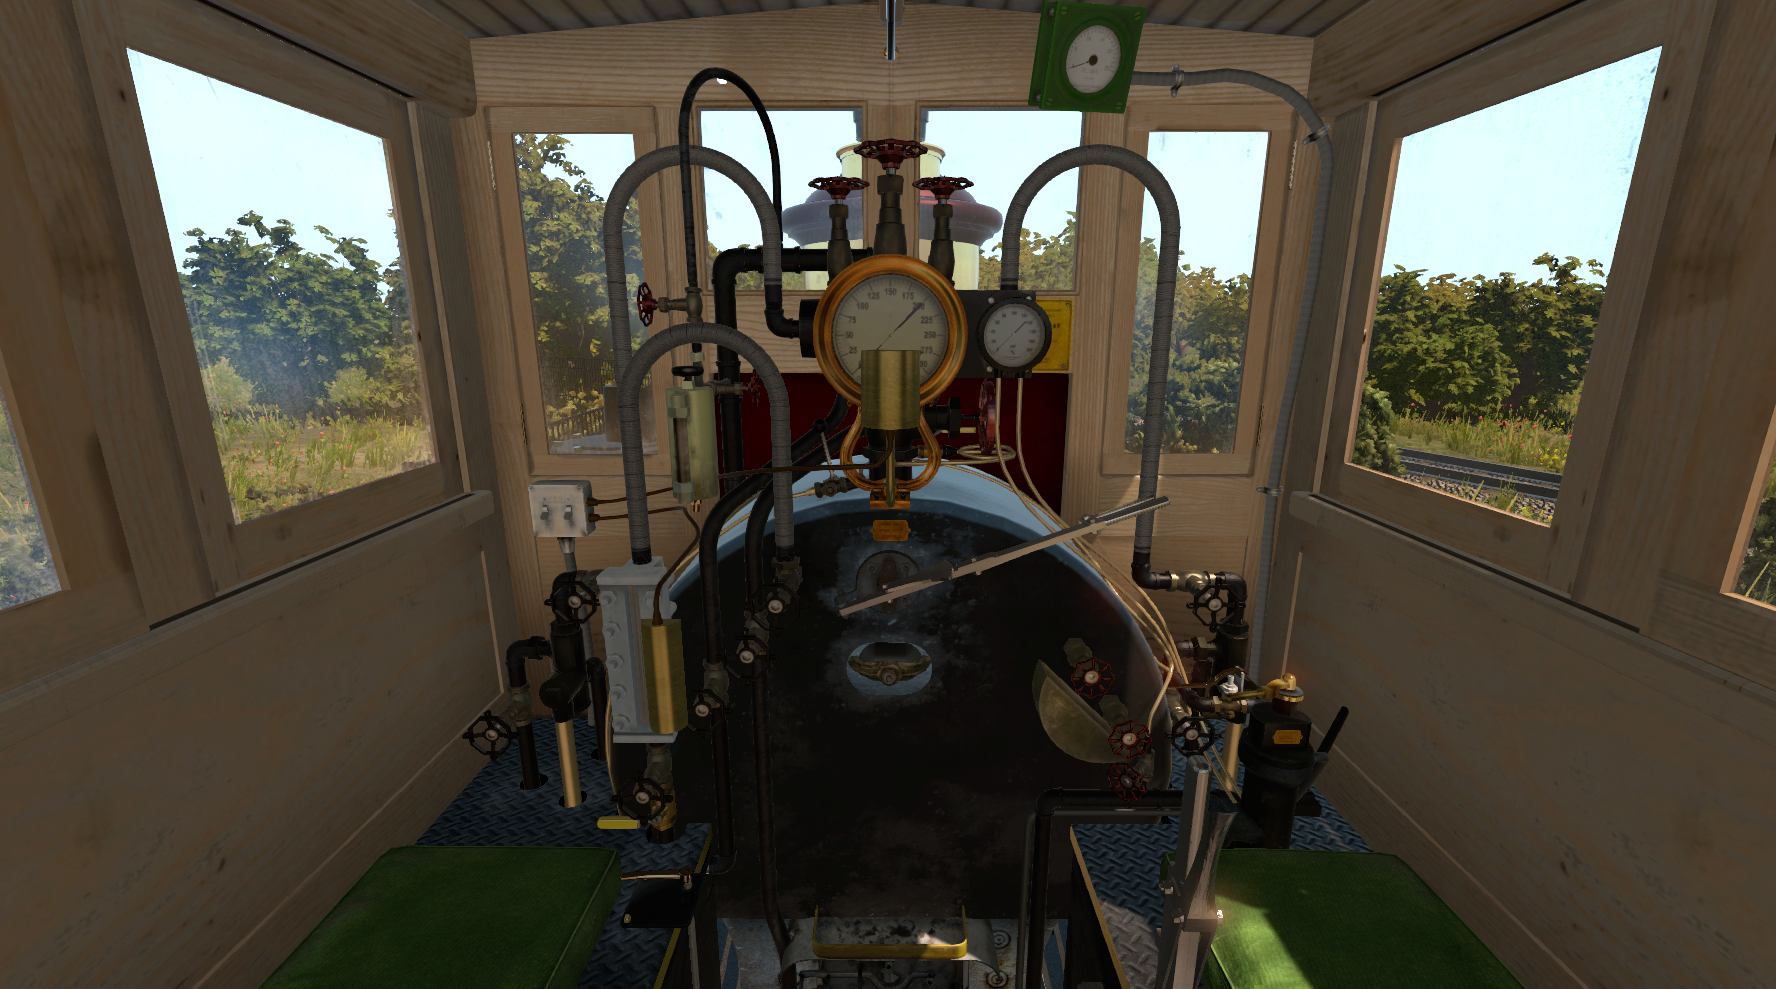
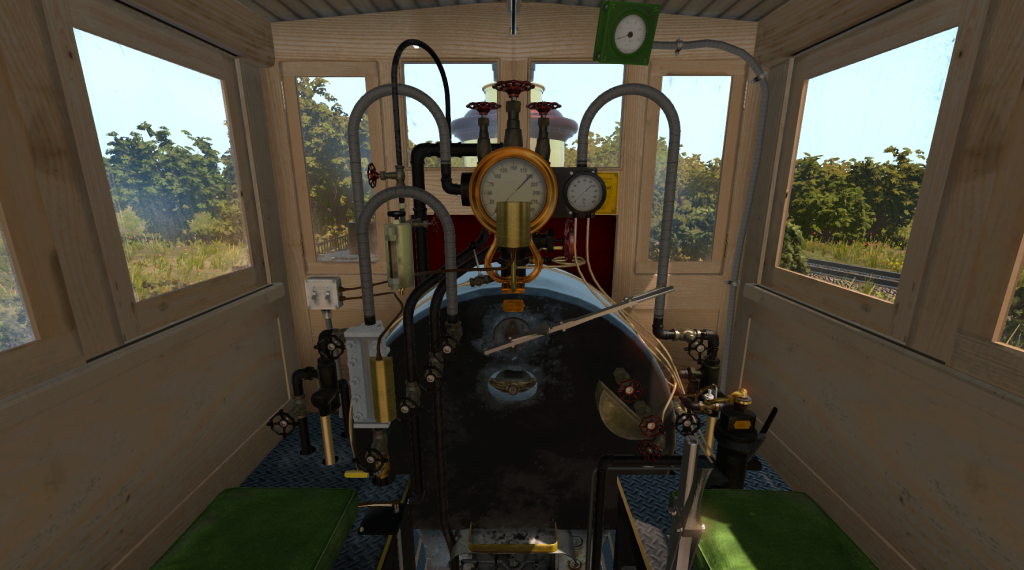
Let’s start with the main view, above. Here’s your new office: the engine’s cab! In here, every valve, lever, and switch have distinct function that affect the performance or behavior of the engine. And they’re all represented here in the sim. Everything works. Even the gauge lamps will draw an appropriate amount of current from the battery… and eventually drain it if the generator isn’t running. And all these controls may look daunting but soon enough you’ll learn what every valve wheel in the cab does, and where each pipe start and end. (The cab today has even more valves and pipes though, due to numerous modifications through many years). I’m sure once you’re familiar with the sim, you’ll be able to talk like you’re part of the crew on your next tender ride.

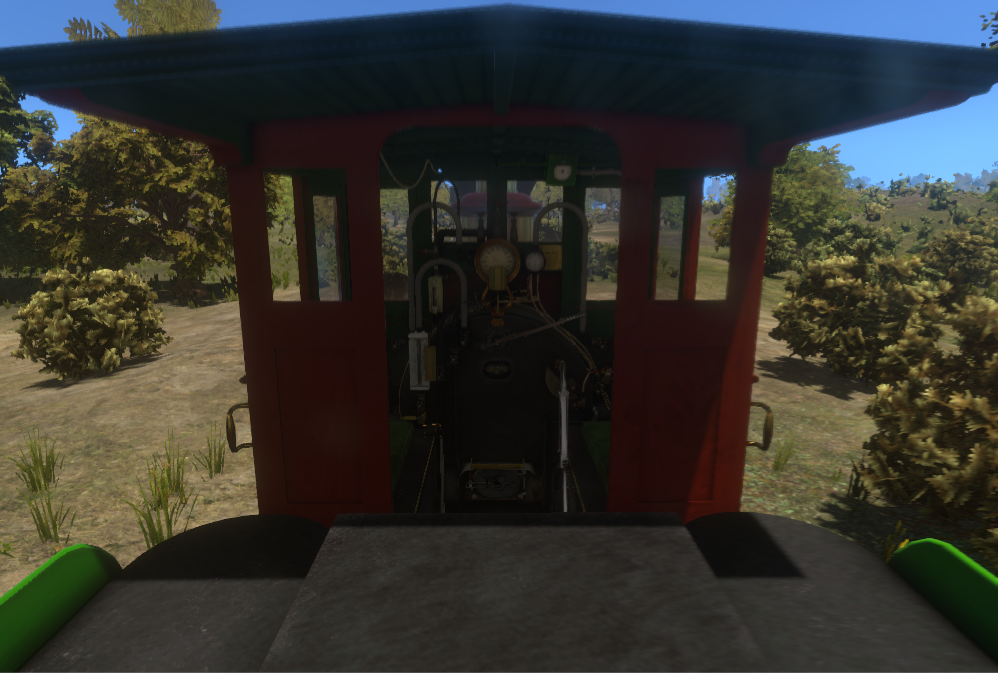
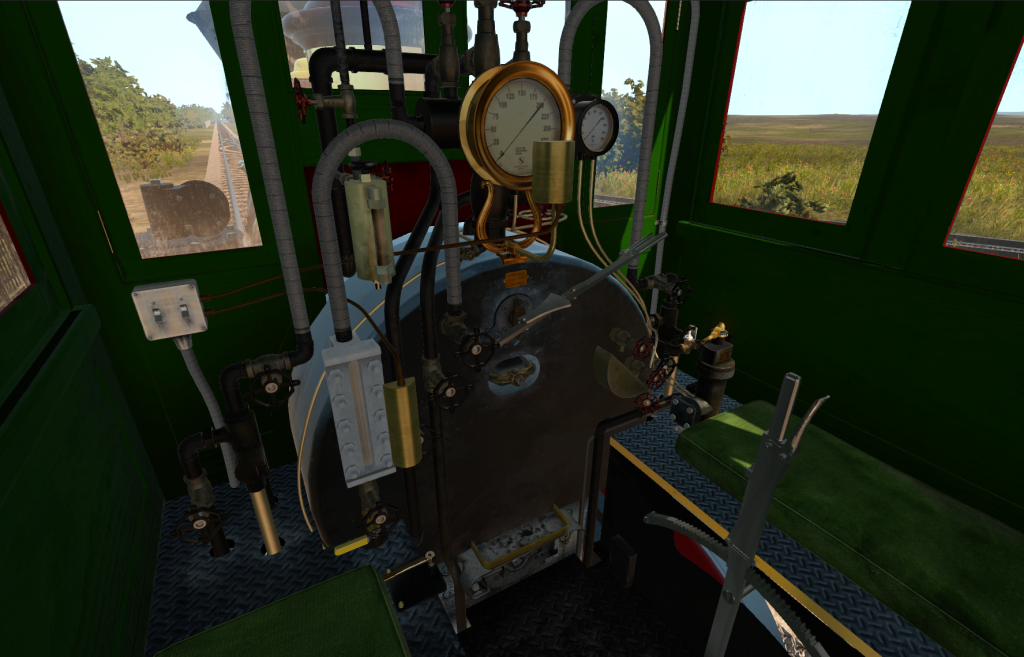
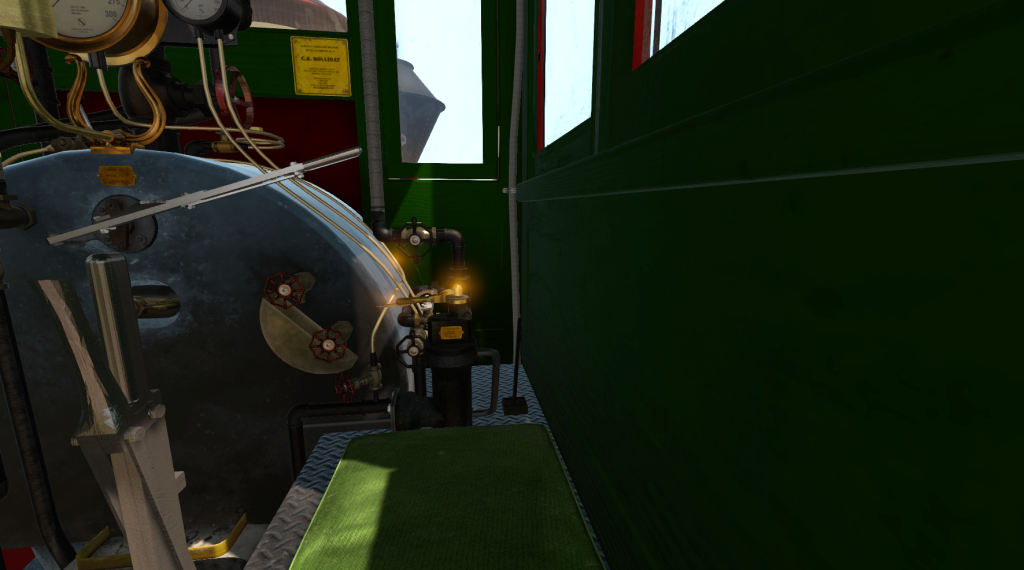
Now, let’s take the left seat… the fireman’s side:

2015-08-16 01_54_18-Greenshot

This is a hard working machine! She’ll be out of the roundhouse for up to 20 hours on some days, and it shows here! Every surface has distinct wear and tear on it. If it’s a bright work, it’ll have received some dulling from constant contact with heat and oil, as well as repeated wiping. In the picture above, you can see the dirt and water stains that the forward windows have picked up.

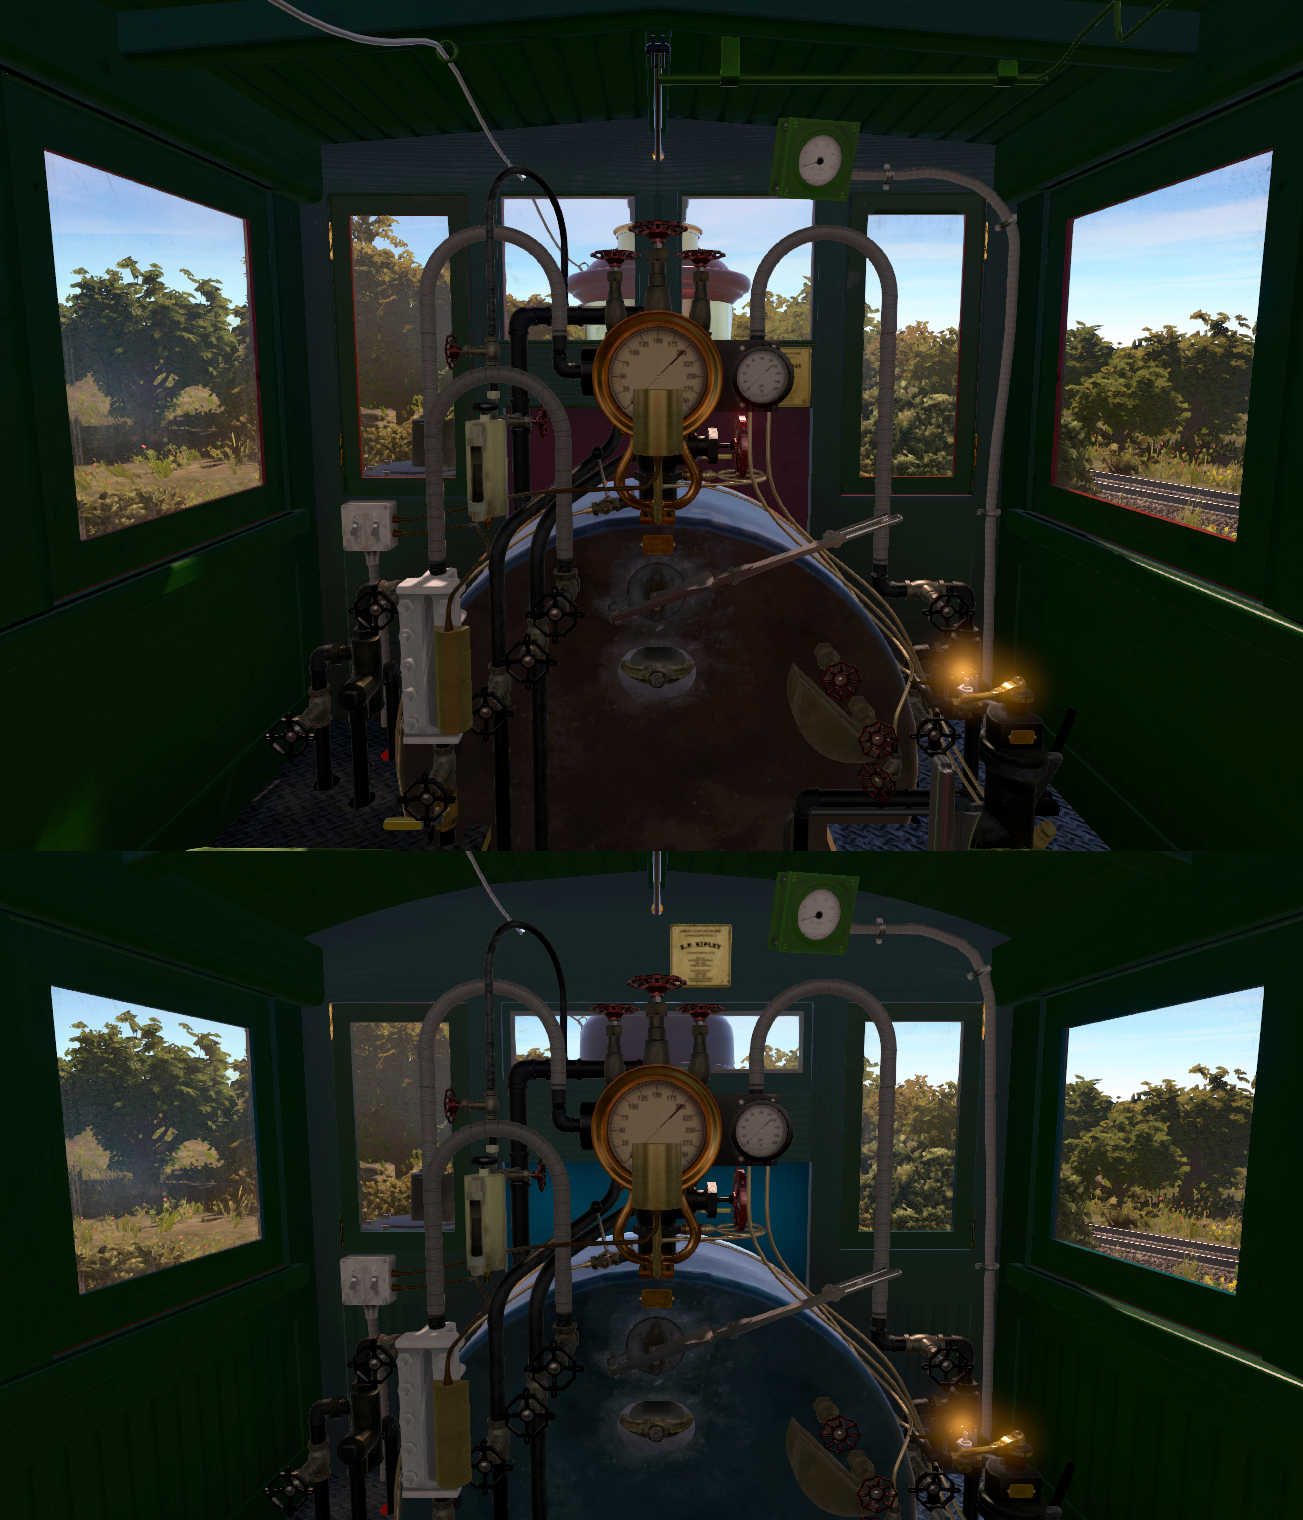
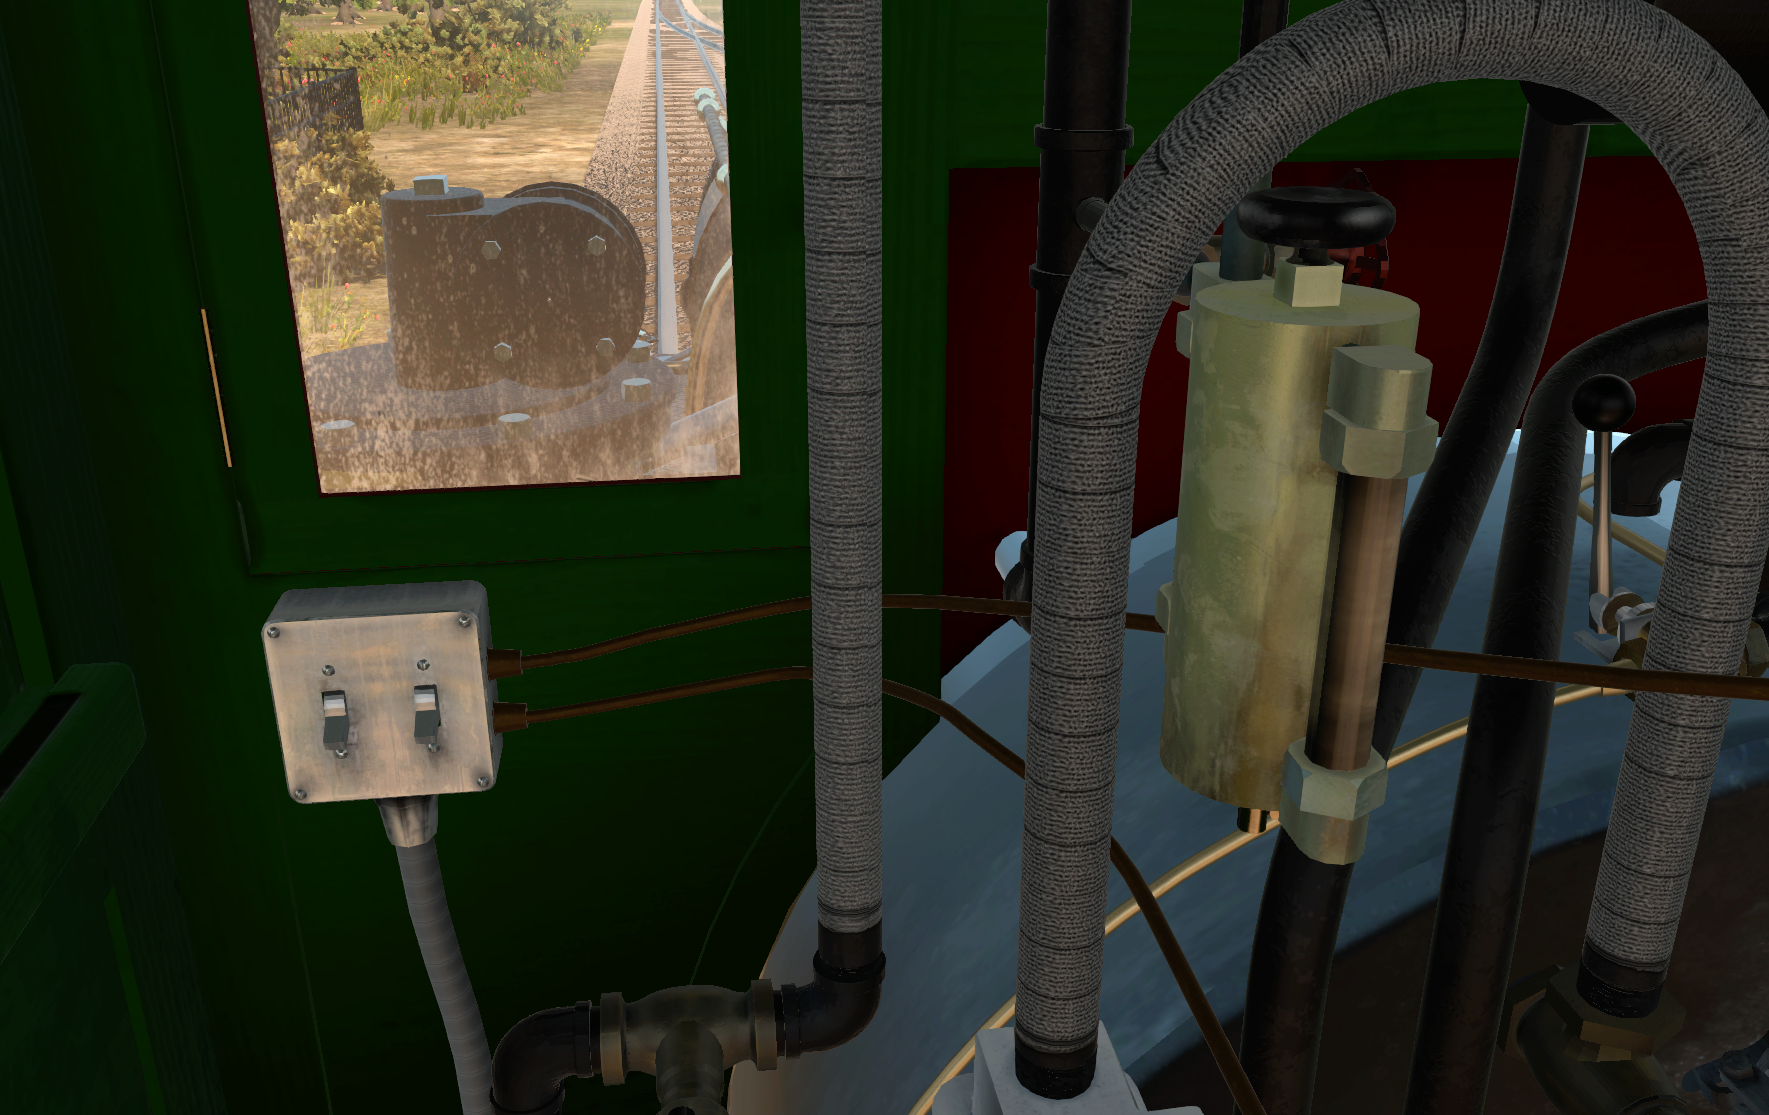
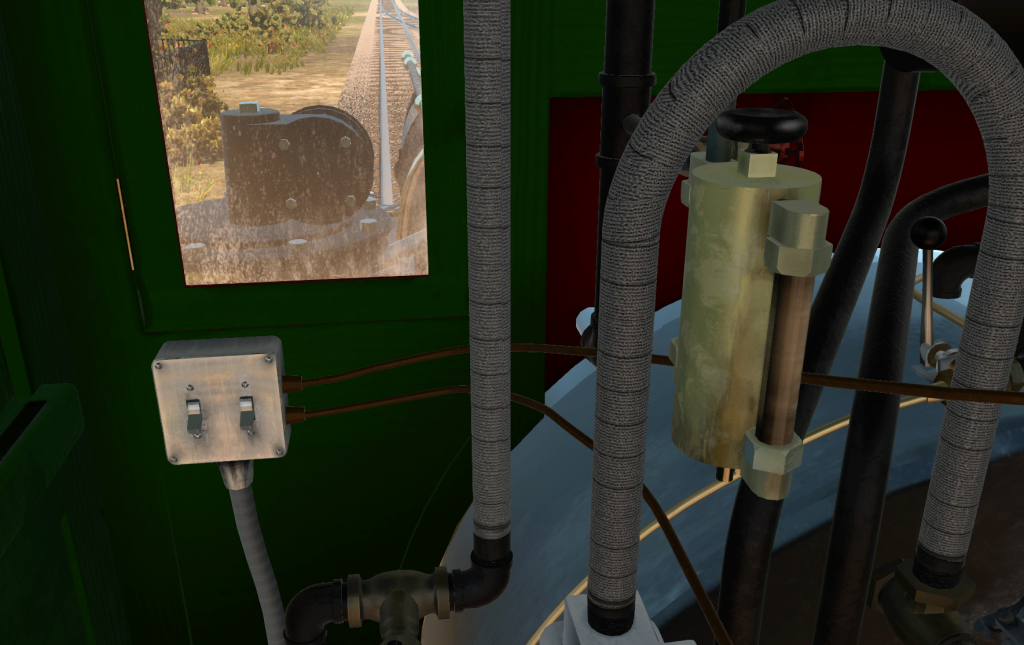
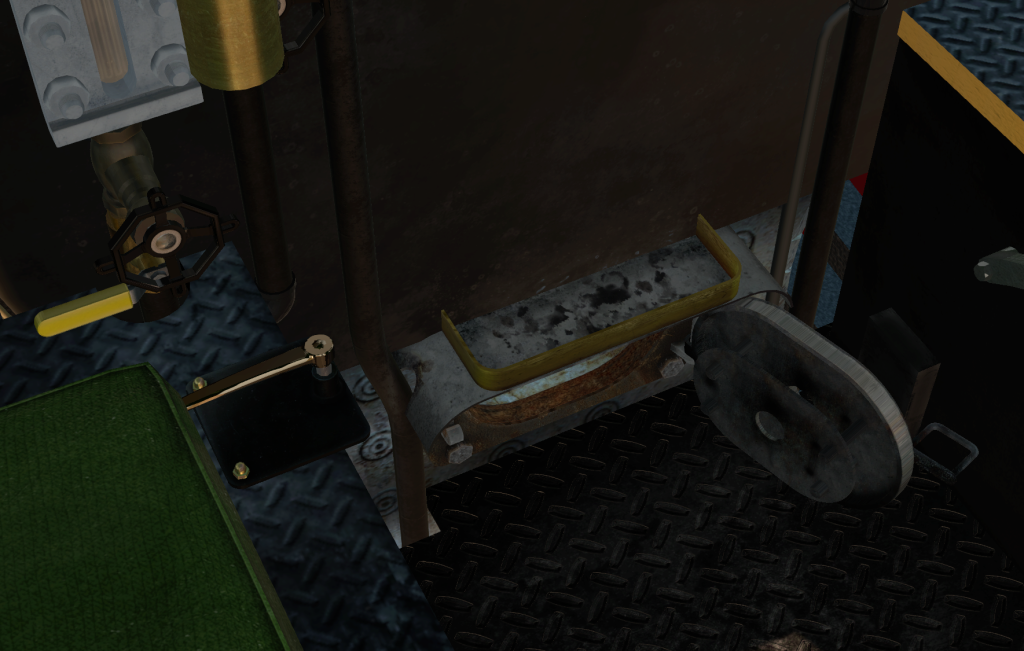
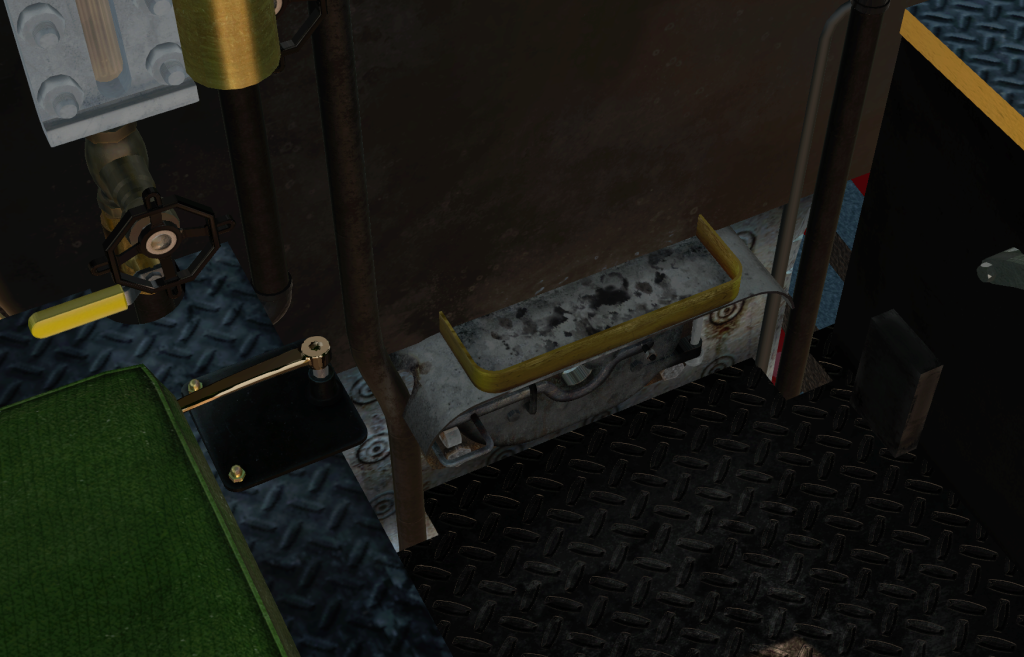
Now let’s get even closer: the hydrostatic lubricator has traces of oil and fingerprints. The oil glass is almost opaque from the thick oil inside. The steam pipes here get a covering of fabric material to protect the crew because they get really hot. You wouldn’t want your arm to graze it when reaching for the blowdown valve!

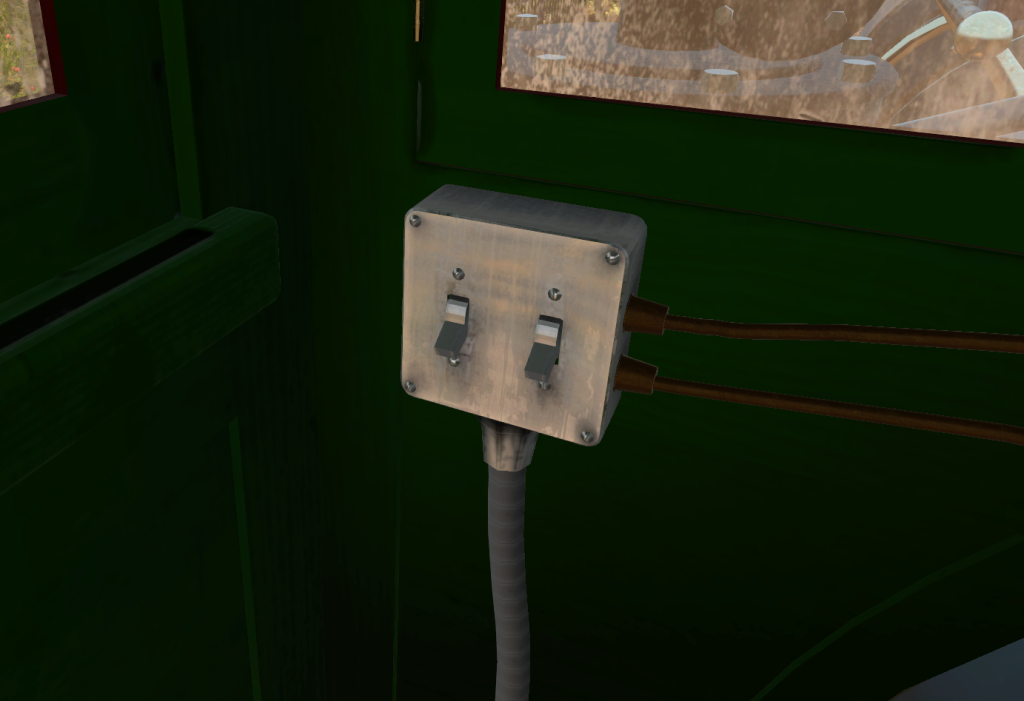
The electrical duplex box still has a little bit of shine on it, but repeated wiping and contact with grease is taking its toil on the stainless steel finish.

2015-08-16 01_54_56-Greenshot

2015-08-16 01_55_46-Greenshot

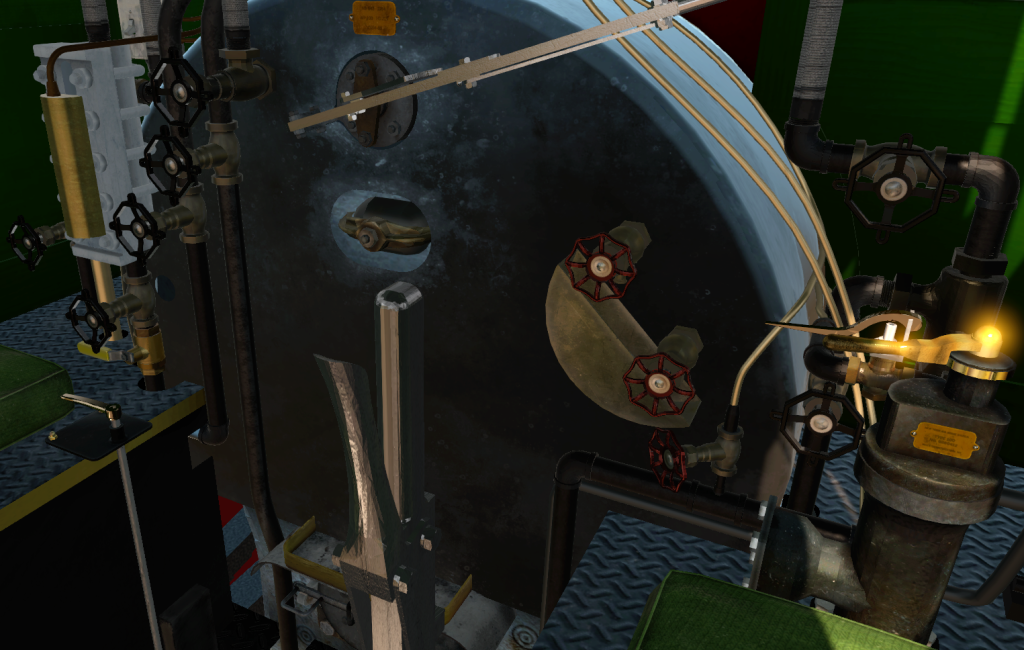
Down below by your feet is the fire door, which is fully operable in the sim with a locking latch/handle. Here is where the hardware is exposed to the greatest amount of heat, so the metal around it has lost their luster and finish a long time ago. We can see the burns that have formed on the inside of the door as well as rust forming around the opening. The concentric circles around the door are the head of the boiler stay bolts. (What are stay bolts? I talked about them previously here and here. These two posts also give you a great section view to see how the stay bolts work).

2015-08-16 01_56_55-Greenshot

Right above the fire door is an oil shelve… where you see all the oil stain build ups. The crew put their lubrication oil here on this shelve because the oil is too thick to flow freely at room temperature.

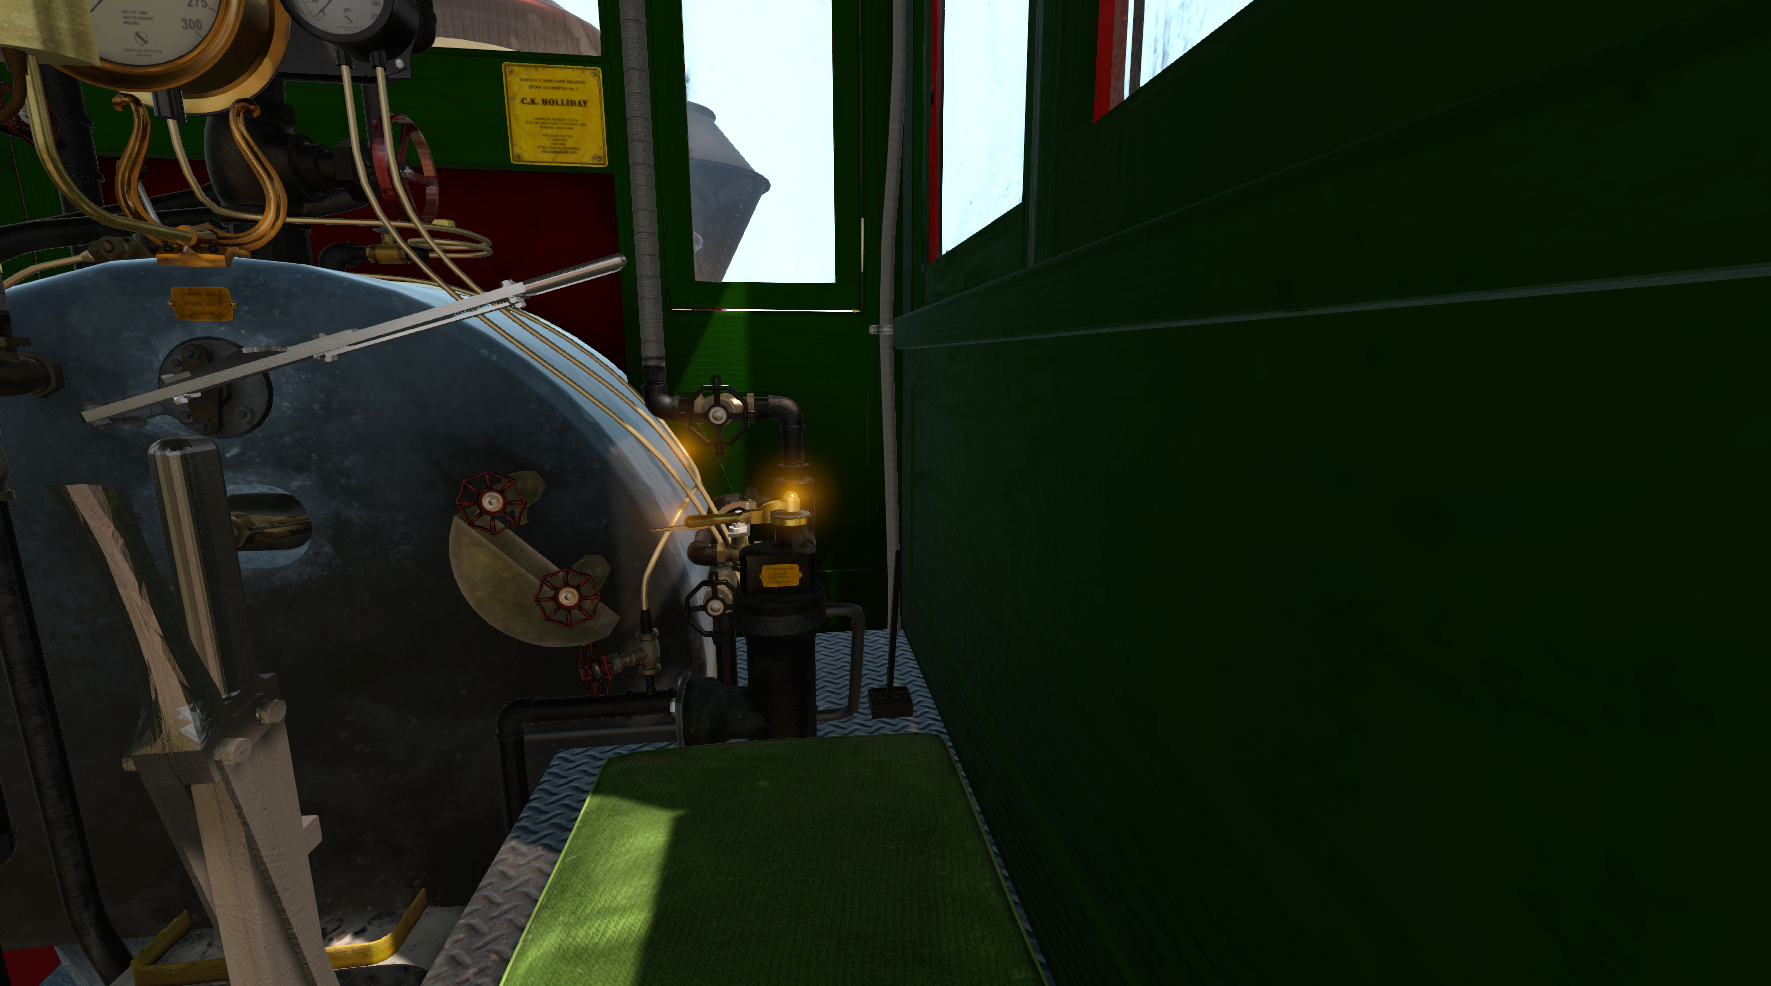
The running boards, which become the seating platform for the crew has also dulled out from use. You can see little bits of grime and dirty oil build ups near the raised pattern.

2015-08-16 01_57_04-Greenshot

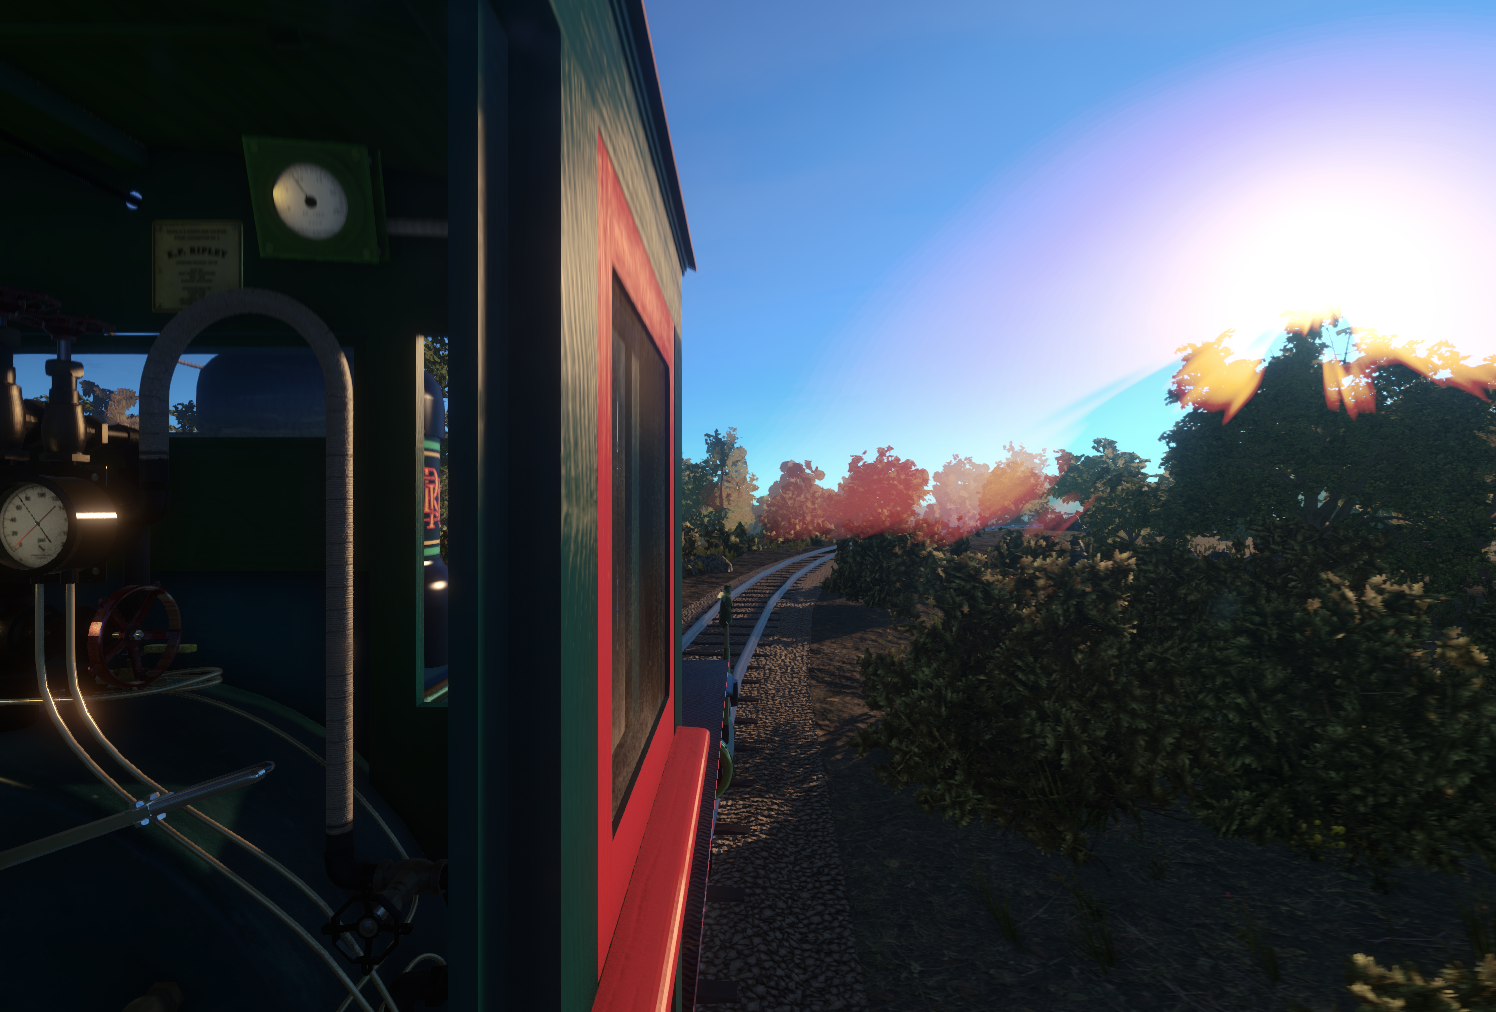
For the next part of the tour, let’s move over to what you’ve been waiting for… the right seat! Here’s the engineer’s view of driving the CK Holliday. Note that I’ve opened the forward window and the side sliding window. You can see the water stains from the rain that has built up on the outside of the window.

2015-08-16 01_58_35-Greenshot

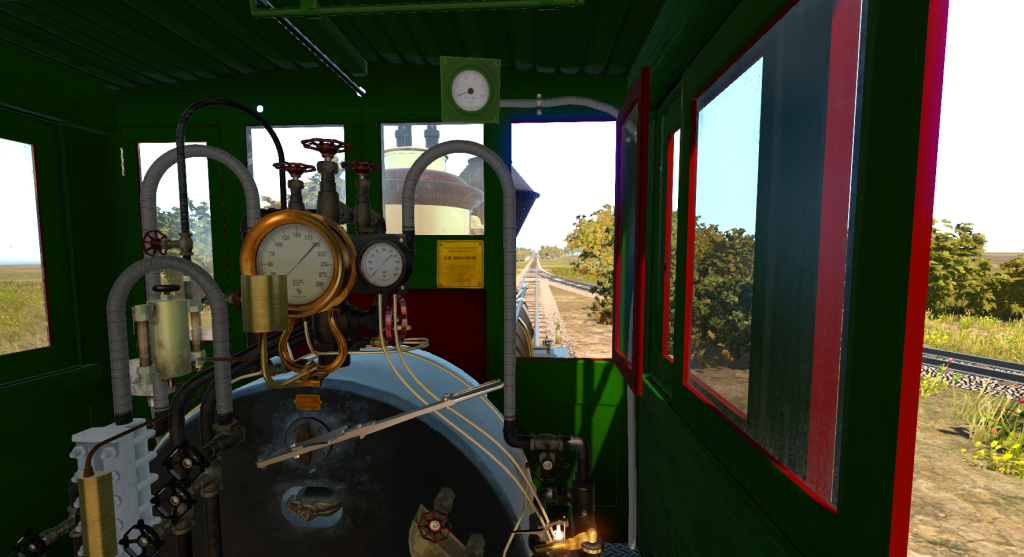
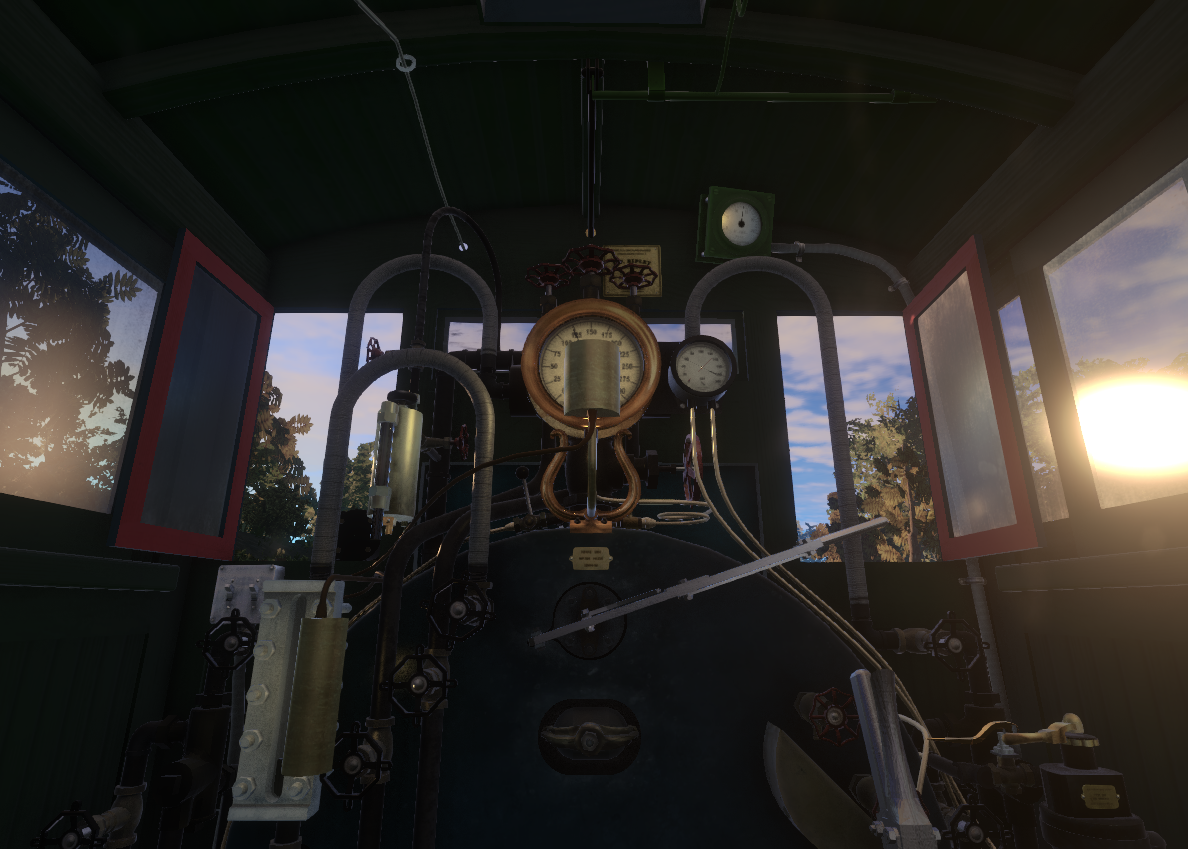
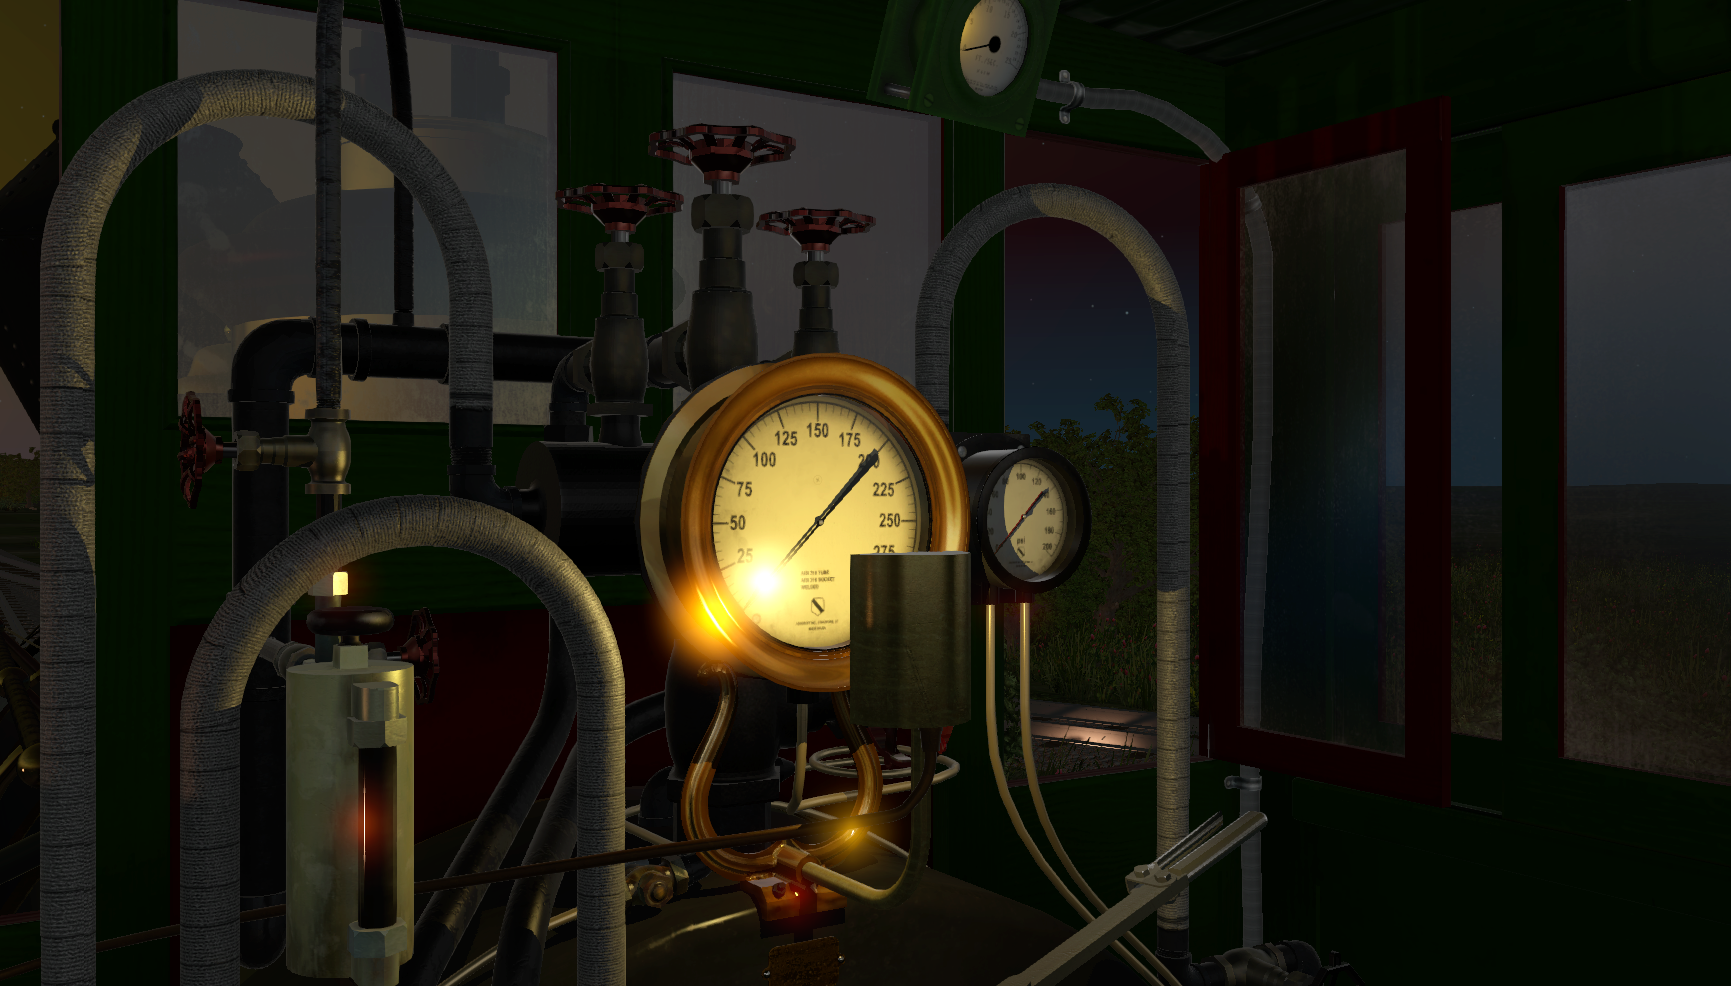
From the engineer’s seat you get a commanding view of the tracks ahead, as well as the few gauges adorning the cab. The speedometer is mounted right above the right forward window. Let’s take a closer look at the other gauges for now…

2015-08-16 02_01_54-Greenshot

2015-08-16 01_59_47-Greenshot

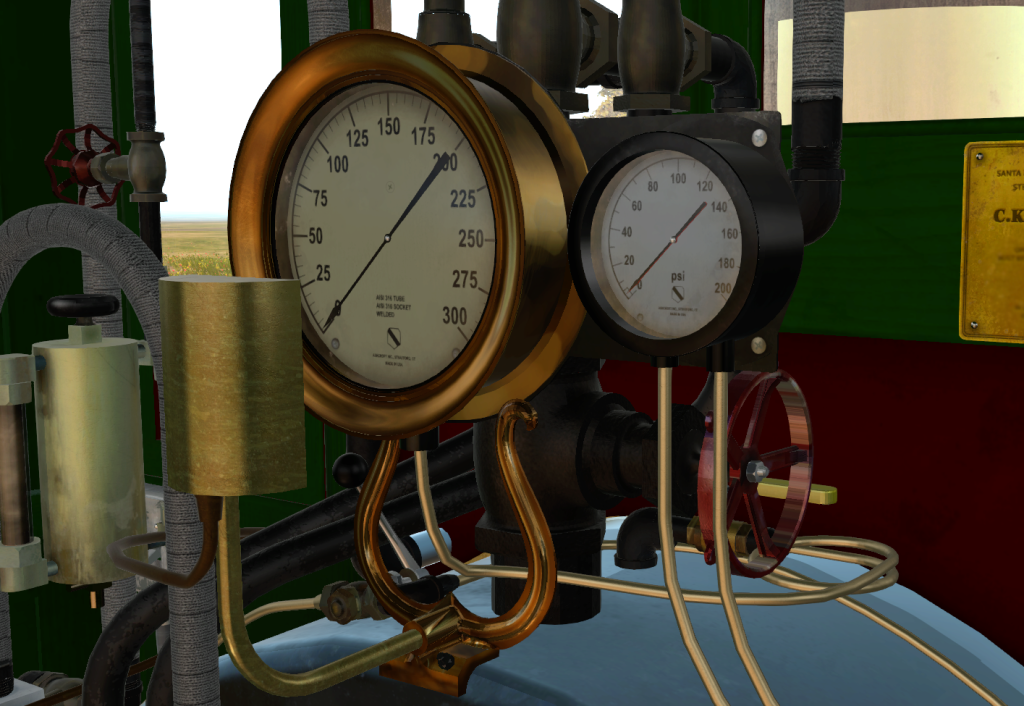
The main gauge is the boiler pressure, and to the right is the air brake system gauge, that you as the engineer will use to stop the train. The gauges are rendered in 3D per their respective manufacturer’s specifications. You can even see the three screws, 2 pan heads at the bottom and a flushed flat head at the middle top, that mount the gauge’s face to its body. The faces have been faithfully reproduced, right now to their specification fine prints! And of course the gauges’ have a covering glass, which you can see in the sim with real time dynamic lighting and reflections. There are some smudges and grimes at the edges of the glass where yet more dust and grease have collected.

2015-08-16 02_00_45-Greenshot

In the above picture you can see the controls on the engineer’s side. Again, each control shows its wear and tear from constant use. But that doesn’t mean the engine isn’t well taken cared for! You can see that some surfaces still retain their shine, like the brass air brake handle glowing when the sun hits it just right.

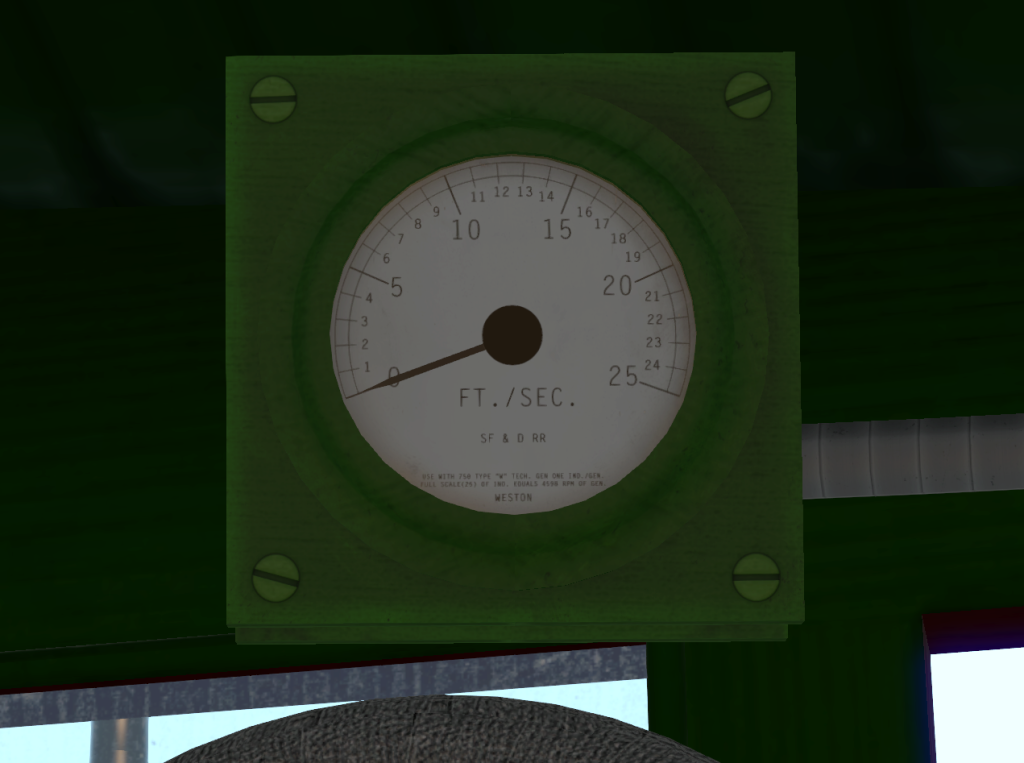
Now, back to the speedometer. It’s the green box mounted above the right forward window. It’s been reproduced in the sim right down to the individual graduation and the “SF & D RR” marking. You can also see that the speedometer reads in feet per second.

2015-08-16 02_01_29-Greenshot

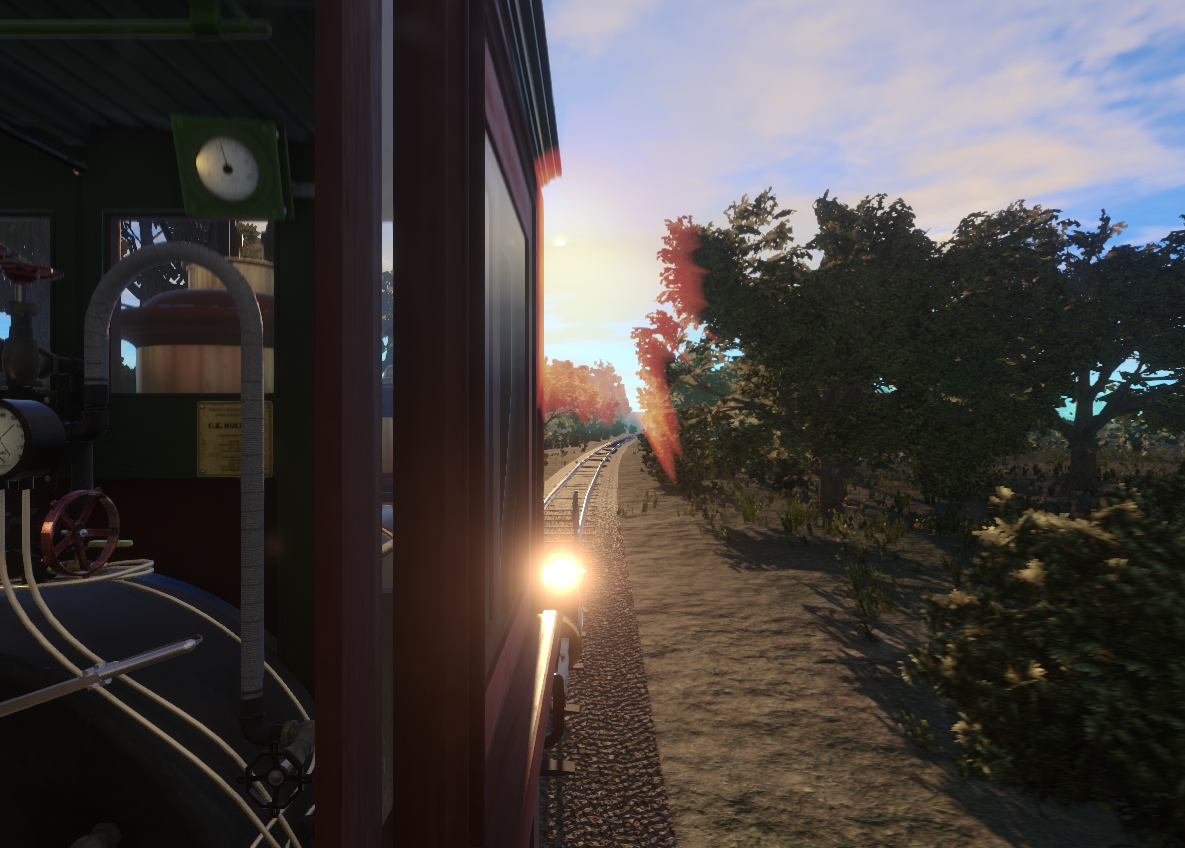
Okay, let’s show off some of that dynamic real time lighting and shadows I’ve been talking about.

Now the sun is setting to the left. The lighting color has grown warmer, and it’s casting a very graceful shadow from the Johnson bar across the right seat.

2015-08-16 02_04_18-Greenshot

This is probably one of my favorite time in the sim (and real life, too!). The shadows are now much softer and even landing on the boiler gauge’s face. All those controls cast their shadows on the cab’s side panel. The sky has turned pastel…

2015-08-16 02_06_09-Greenshot

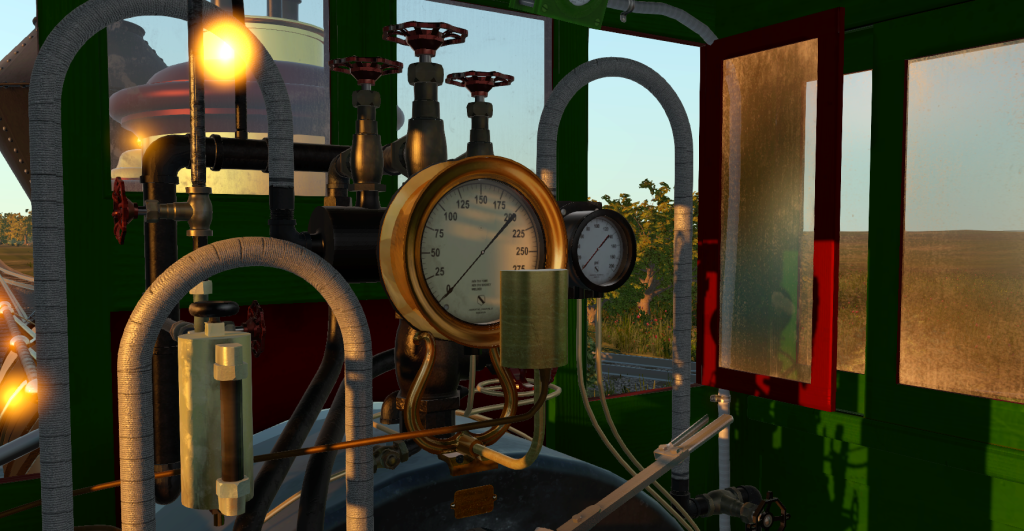
… so it’s about time to hit the lights! As the dark evening sets in, we can hit the lights to illuminate the gauges. We can see the lamp casting shadows onto the pipes as well as the bright highlights from the brass gauge stand. The speedometer at the top of the picture also lights up from its internal lamp, activated from the same switch.

2015-08-16 02_07_51-Greenshot

Similarly, there is a lamp for the water glass, also controlled from the same switch. The way the light casts the shadows from the water glass’ geometry and the bolts really give a feeling of depth to the scene. There’s even very subtle hints of bevels in the sight glass itself.

But with all good things we have to take bit of caution here. The real time dynamic shadows can be very costly to the sim’s performance—you’ll need a fairly strong computer to run all these features well. There will be an option to turn off these shadows to help with the performance on your computer, but it still looks great and very convincing even without these shadows. There will be several options like this in the sim purely for you to tune the sim’s performance, of course at the cost of losing some eye candy.

2015-08-16 02_08_19-Greenshot

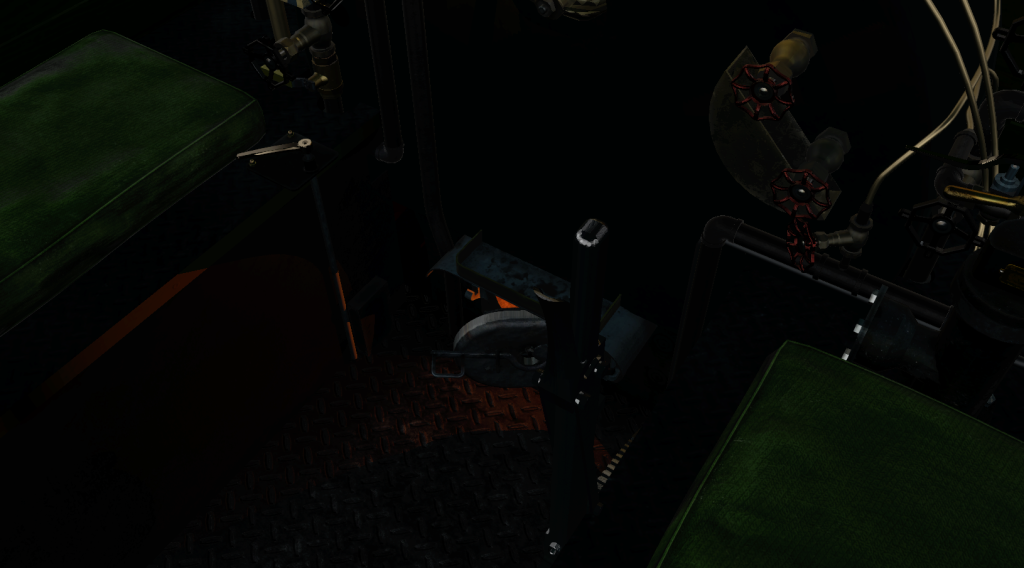
This might be hard to see (make sure you check out the enlarged picture), but the other light in the cab is of course the fire! Here I’ve lit a very low fire, and its warm red hue glows dimly on the foot plate. What you can’t see in the picture is the flickering of the light. It’s very cozy and I could just sit there and watch it for hours like a real fire.

2015-08-16 02_10_54-Greenshot

I hope this next one shows up okay. Well, just because the whole cab is painted doesn’t mean there’s no surface details! Here, if you look closely enough you’ll see slight variation in the paint due to the wood grains beneath the paint. The shininess of the paint even follows the wood grain! These wood grains were hand-placed following the correct orientation of each piece. For example, a post will have vertical grain while a panel might have horizontal grains. You’ll be able to see all of this. Check this out in the side panel, or the panel in front where the edge of a panel gets hit by the sun beam.

And while we’re here check out the try-cock funnel too! There are variation in the shininess again because it had been used before, and the brass is wearing dull.

2015-08-16 02_13_48-Greenshot

Let’s take a closer look…

2015-08-16 02_15_38-Greenshot

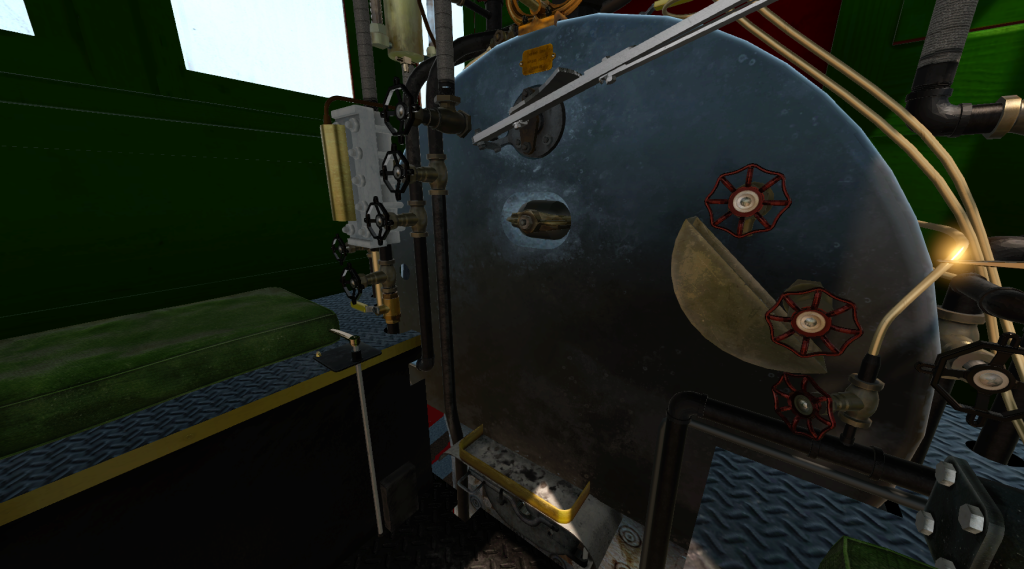
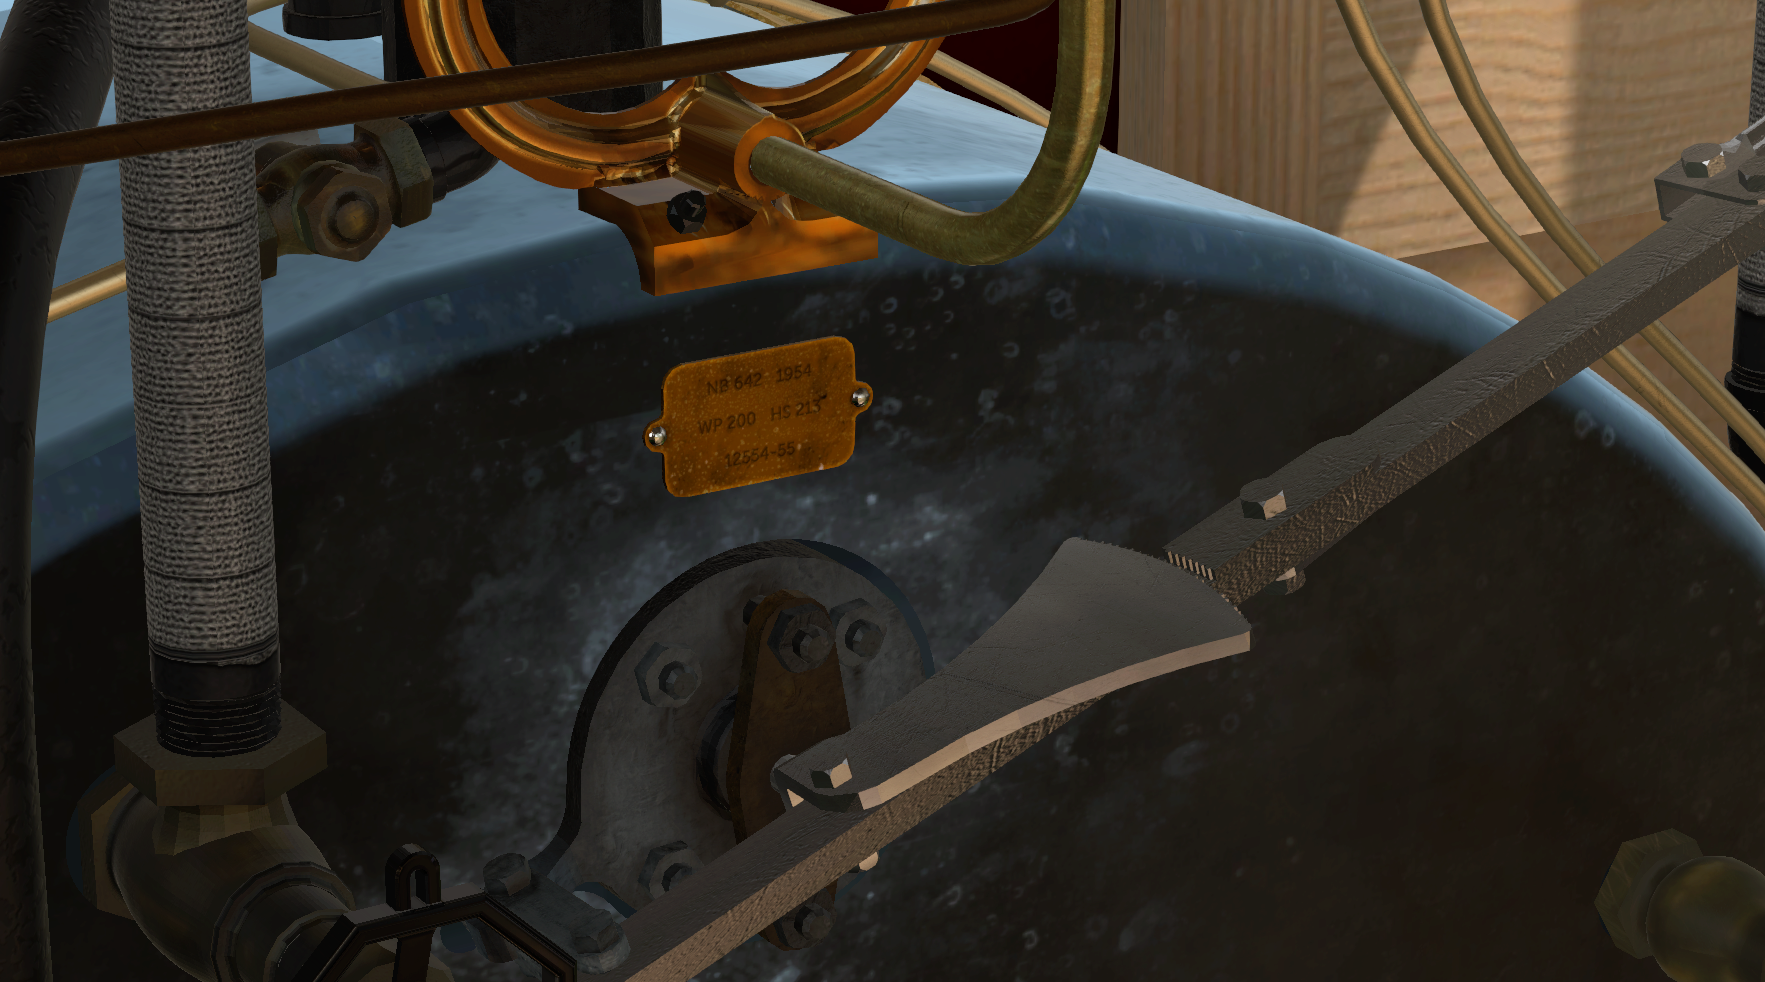
Ahh ha! The back of the boiler jacket has received its share of wearing also. A part of the jacket’s bright coat has dulled away from the heat and constant use and contact with the crew. There’s even water stains on the jacket, perhaps from the try-cock or even from the dripping of water/steam from all the pipes around it.

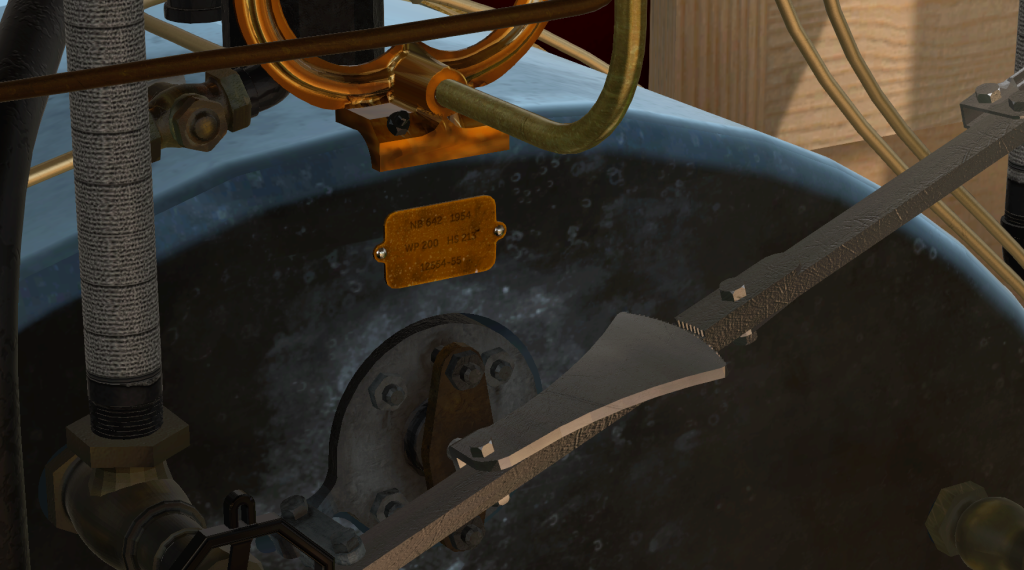
Here’s another closer look at the wear on the boiler jacket. The area around the throttle packing has received considerable wearing and is much duller than the area around. This is because the throttle packing gets disassembled and reassembled quite often as part of routine maintenance. The boiler’s ID plate right above the throttle has also been faithfully reproduced here in the sim.

2015-08-16 02_19_08-Greenshot

And finally, if you prefer the natural state of things, you can have the cab without the paint, exposing the ash wood underneath all that green paint!

2015-08-16 02_17_26-Greenshot

What do you think? In my opinion, it looks much warmer and bigger than the painted green. But hey… the green is proto typical and it does help cover up all the oil and grease.

I hope you enjoyed this update. There’s still a lot more work left (as always!) but you can see that it’s actually coming together. You’ll be able to have your very own CK Holliday soon!

3 Comments

Filed under Steam Engine Simulator

46: the eagles are coming!

Dennis (IDMT129) at the Burnsland Disney Railroads forum shared his very thorough research on the iconic eagles that mount each of the Disneyland Railroad engines (err… except for one).

Here’s one of the eagles he studied, with Dennis’ own picture. This one is on the Marsh engine:

In the post, he details the differences between each of the four eagles. Even what kind of damages and repairs each eagle obviously went through. For example, Dennis’ sharp eyes observed:

EP Ripley has an interesting feature. The feet have been re-weld backwards. The front 3 talons appear under the tail and only a single talon is viewed from the front. You can also see the perch is a separate feature from the ball and welded in place with a spacer or blank embedded in the weld. The Hex nut under the ball also appears to be another welded after feature.

Indeed, this writeup is probably the most detailed study on this subject yet. I won’t repeat too much of what he’s already said—you can check it out yourself. But the result of his in-depth study is that he came up with a 3D model of the Ripley’s eagle, and he was kind enough to share it with me!

2015-07-31 07_47_09-Greenshot

Wow! I already expected much before I saw the model but once I opened it, it completely blew me away! It’s just chock-full of details! The subtle details like each ruffle of the feathers, the eye depressions, the beak, and more, all come together to create this amazing replica. Check out how finely it’s subdivided:

2015-07-31 07_47_49-Greenshot

I would guess that it was made in ZBrush.

And so once I had the model, I of course had to render it 😀

eagleshot03

The above is the classic profile you might recognize. And here’s a very majestic 3/4 shot of the finial.

eagleshot02

And the hero shot:

eagleshot01

There’s some real weight in the model, especially when rendered. Great job, Dennis!

Leave a Comment

Filed under CK Holliday build

updates: the engine in motion

For the past few months I’ve been working on a pretty big project to convert the sim into a 3D environment. In the first preview video I showed you that the sim was going to be a flat 2D/2.5D picture of the cab, with a view that’s like operating the engine from the tender seat.

Well, all that has changed and the entire project is slowly being converted into a 3D simulator very similar to the popular train simulators out there. Now, I have to put my disclaimer again that I’m not aiming to compete with those games and sims out there because I have a completely different intent than what they achieve. My simulator will very largely focus on the operations and physics of a particular steam engine(s) itself, so if you’re looking for a “digital train set” sim/game then those exist to fulfill your need.

But if you’re interested in learning how a steam engine really works, including…

  • how opening the throttle too quickly can cause water in the boiler to draw into the cylinders and stall the engine
  • how managing the fire correctly for each phase of the day, like idling at a station or starting a heavy train
  • speaking of starting a heavy train, how to manage the throttle so as not to cause the drivers to slip… and if they do, what you can do about it (…when the fire goes out due to a vacuum caused by the rapidly moving pistons!)

…then, okay, this is the simulator for you!

So, the 3D aspect is a bit of a bonus and it will certainly give you a very realistic perspective of being in the cab. There is much more to do but I want to highlight some of the features that are coming your way.

Here’s a start: check out how the sunlight coming through the cab windows hit the valve wheels, shining brightly and laying their shadows onto the boiler. The shadows are also in realtime, which means that they’ll move properly while the engine is moving and when the valve is operated. I’m also spending a lot of effort “painting” photorealistic textures onto each surface and device in the cab. In this shot, check out the subtle rusting on the pipes and the scratches/buffs on the boiler jacket. Indeed, you’ll get an authentic feel like you’re right there in the cab of a well-used but well-maintained steam engine.

2015-06-01 21_08_15-Greenshot

It doesn’t end there. Even the subtle movements of the gauge needles have been considered. Take for example, when the engine is moving. The forces of the tracks (roads) get transmitted throughout the engine and get translated into vibrations. In this animated shot, check out the very subtle “wiggle” of the needle as the engine rolls down the track. Watch carefully and you’ll see that the gauge frame is also vibrating a little bit. In the sim, you’ll see the whole engine vibrates that varies with the speed! (The animated picture is quite large in file size, so if you don’t see it just open it in another window here).

Unity 2015-06-01 20-26-35-77

As before, the vibrations get transmitted everywhere. Imagine what would happen if you have a bottle of water in your car as you’re driving. Well, it happens in the sim, too! The movement of the engine can make reading the water level a bit challenging. You’ll have to be careful to not read (too much) into the level when the engine is accelerating or decelerating, because the water level will read too high or low due to its inertia.

Unity 2015-06-01 21-06-03-76

What about draining the water glass due to clogging from sediment buildup because you either didn’t use water treatments or you used water with a lot of impurities? Or if you close the top (steam valve) and the water in the glass starts to rise due to the cooling steam at the top of the glass creating a vacuum? Yep! It’s modeled. (Thanks to Mowsefan at Burnsland for the information on that!)

The heart of the simulator has also been extended quite a bit since the last video preview. Check out all these options, spread out over 5 different pages, that’ll allow you to control control and customize your engine to your specific liking and needs. The menus are not done yet either—there will be additional options to add in the future, too. (Click on the picture to get a larger size that’ll let you see the text better).

Unity 2015-06-01 22-16-20-17

I’ll have to devote some other time to discuss what those options do, but for now I think you get the idea of what I have planned.

The beauty extends beyond the cab’s interior, too. Here’s a small part of a fictional track that I’m using for building and testing the engine. Grass, flowers, and small shrubs and trees all make a part of a realistic scene outside of the cab. Oh, and they’ll react to the wind and weather, so on a windy day you’ll see the grass blowing and the trees sway… or even when you open the blowdown valve you’ll see the grass sway away from the escaping steam!

2015-06-01 21_17_50-Greenshot

And finally, you will have a dynamic sky! It’s just so pretty that I’ll let the pictures do the talking. But let me just say that the sun, moon, clouds, and weather are all dynamic. You can have a clear sunny day or a foggy or a rainy day. It’s all customizable in realtime or you can just let the dynamic time and weather engine handle it all. Oh, and the celestial objects, including the sun, moon, stars, and planets are all accurate depending on your chosen date.

2015-06-01 21_10_41-Greenshot

That’s it for now. Not a very long update but I feel like it’s a big one; at least it’s a big step for the sim for sure and it took a lot of work to get to this point. I hope you enjoyed it!

4 Comments

Filed under Steam Engine Simulator

perspective

goodnewseveryone

Good news, everyone! I’ve made some really good breakthroughs and progress on the simulator. The bad news is that I still don’t have anything ready to show yet!

It’s been slow going because a few months ago I decided to redo many aspects of the simulator. It is now “almost” entirely new from what you saw from the preview videos.

There’s a lot of stuff to consider! Like not fully opening one or both of the water sightglass valves will cause the water level in the glass to change slower than what’s actually in the boiler, or that closing the top steam return valve can actually cause the water level in the glass to rise due to condensing steam above. So the glass can actually lie to you!

2015-05-09 10_27_59-Greenshot copy

Leave a Comment

Filed under Steam Engine Simulator

45: tender frame

I bet you didn’t think you’d see another CK Holliday build update! There’s so much going now on this blog between the virtual build, the simulator, and the Haunted Mansion. But, I thought I’d go ahead and post some pictures to show what I have so far for the long-waited Holliday tender.

2015-03-13 16_37_36-SolidWorks Premium 2012 x64 Edition - [1.1001_chassis _]

There are just four steel beams supporting the tender “tank” above. Can you tell which end is the front? Yes, there’s a difference!

2015-03-13 16_38_10-SolidWorks Premium 2012 x64 Edition - [1.1001_chassis _]

The trucks are detailed with their springs and pockets and saddles.

2015-03-13 16_38_46-SolidWorks Premium 2012 x64 Edition - [1.1001_chassis]

And of course the “Disneyland Railroad” and “Lovsted, Seattle” stamping!

Leave a Comment

Filed under CK Holliday build, CKH Plans

a free haunted mansion update

I know some of you are really eager to get the Haunted Mansion architectural set. That’s not done yet, but I decided to release a version of it for free!

This drawing is something I made a long time ago with intention of releasing for free, but I guess I never got around to it. Well, here it is. It shows three elevations visible to the public in good details. I admit that it does lack decorative railing details, which is something that the full mansion architectural set won’t.

2015-03-13 17_00_21-elevations composition - inverted - 100 - Windows Photo Viewer

This “lithograph”-style drawing has a dark background and a subtle “wandering” and fading “hand-drawn” look to the lines, evoking the famous Mark Davis drawing of the original facade.

To download a full size copy, just click the picture below and save it to your computer. Again, the drawing is provided free and you may distribute, modify, or use it in your project. But you absolutely may not make money from it, or use it to make money in any way.

elevations composition - inverted - 100

Also, note that the titleblock on this drawing says “Balboa Observatory”. This is just for me to avoid saying “Disneyland’s Haunted Mansion”.

Enjoy!

7 Comments

Filed under Haunted Mansion

a helping hand or four

Occasionally, I code some of the simulator from the bed, and when I do I usually get a helping hand… or four!

2014-08-10 00.03.40

Certainly, they are my QA/QC team and they want to be sure that the sim’s release is purrfect 🙂

1 Comment

Filed under Steam Engine Simulator

a day at the DRR

This wonderful, rare video shows what it’s like to to work with the CK Holliday at the DRR on a typical day: from warming up and prepping the engine early in the morning, to putting her back at the end of the day.

Check out the awesome number of different sounds! Every hiss, creak, and clank means something to the engine. And there are the numerous valves use to test and control the engine. I’m working hard to make all of this happen on a computer. Almost everything that you saw in the video you will be able to experience at home.

It’s evident from the video that a steam engine surely is a living thing. Creating this in the computer isn’t easy: but I intend to make each sound you hear from the simulator be dynamic, meaning that the “same” sound will be different each time depending on the condition of the engine, like steam pressure, engine speed, engine temperature, valve positions, etc. Computers are purely logical, where A+B always = C, but with a steam engine sometimes A+B = D, because there’s a variable you didn’t know about.

Anyway, it’s a hard job to make something completely logical like a computer to become something dynamic with a personality like a steam engine. But… it’s coming!

1 Comment

Filed under Steam Engine Simulator

happy new year! and updates

Happy new year! This year, 2015, the CK Holliday is 60 years old! (Or 61, if you consider her birthday in 1954 instead). It would be great if the simulator can be released this year in conjunction with her big birthday, wouldn’t it?

I’ll try my best, but there’s a lot of work to do yet. Unfortunately, I don’t have anything to “show”, but I can tell you about some of its progress:

  1. The engine can move! The throttle and reverser bar have been “installed” so with a sufficient steam pressure, the throttle can be opened to supply power to the cylinders.
  2. The throttle and reverser bar interact in a realistic manner. You can control the engine/train’s speed by either adjusting the throttle, the reverser, or both. Which one is better, or more efficient in term of steam usage vs motive power? You’ll have to experiment to find out
  3. I ended up having to add some custom scripts for better control of the throttle and reverser bar. For example, scrolling “down” on the reverser, if it was forward, will bring it back “up” to center (neutral). This is to prevent you from moving it passed center by accident. To move the bar passed center to backward you’ll have to hold down the left “alt” key while scrolling. Also, you can bring the bar up to center immediately anytime by clicking it with the middle mouse button. I hope this kind of control will be useful for you.
  4. The engine’s total “motive power” is modeled on the driver crank’s positions! (This is not the “tractive power” which doesn’t depend on the crank’s position). When the cranks are fully “up” or “down”, the cylinders are able to deliver maximum power to the drivers because the moment arm is the greatest. Whereas when the cranks are fully “forward” or “rearward”, minimum power is available because there’s no moment arm. Of course, for this reason the left and right side cranks are offset.
  5. This means that the power delivered to the drivers continually changes! While the engine is moving, there’s a small variation in power delivered as the drivers turn. When the speed is fast enough, it all averages out, so this effect is most pronounced when the engine is slow.
  6. When the engine is stationary there’s a certain crank alignment (or really the valve alignment) where the engine can’t deliver any power so it just won’t start! This is called dead center and it is modeled. To remedy this situation, you’ll have to shift the valves by moving the engine backward a little bit to get of alignment, then you’ll be able to get moving forward again.
  7. Below is an example of this situation. The engine only moved a few inches forward before the valves got caught in dead center—there wasn’t enough momentum yet to move the engine through the dead zone. The engineer then moves the engine rearward a foot or so, then the engine was able to move forward through the dead zone. You can watch the linking shaft closely to see the engineer moving the reverser bar.

There’s plenty more of work to do, including wheel slippage that you can see above. Right now I place it about 40-45% done.

The simulator will come with a comprehensive documentation to help you learn and understand the engine as well. More on this later.

Happy new year!

5 Comments

Filed under Steam Engine Simulator